This project is a perfect example of having to make a situation worse before you can make it better. The space looked solid, but tired ... but we had to almost completely demolish it to correct some serious problems.
Here is a quick tour, clockwise around the room, with some photos approximately before and during demolition. I say 'approximately' because I neglected (once again) to take the "before" photos before I demolished stuff.
Southwest Corner.
The vertical stain on the wall by the window was the scene of one of the scariest electrical discoveries I've made while working here.
The metal electrical box had rusted completely away inside the wall ... and I had been using that outlet just a few minutes before!
After some more demolition, we had this:
West Wall.
Built-in Cupboard on the East Wall.
Bricked-up Fireplace.
South Wall. The left door goes to the laundry room; the right door goes to the hall.
Hall door, again.
One of the prior owners of our house laid strip oak flooring down on sleepers throughout the basement ... wood floor in the basement? What were they thinking? There was vinyl floor glued to the wood floor in the workshop space.
We used a digging iron to remove the flooring, taking it up piece by piece ... revealing old concrete.
The floor along the South wall had a trench cut into it, that had been used to run plumbing to the kitchen, basement bathroom, and laundry room. Until we figure out whether we'll need to use the trench, too, we just covered it up with 3/4" plywood.
Once the room was stripped of the deteriorating plaster and wallboard, we installed new lighting and some new electrical outlets ... and it was time to begin to turn it into a real working workshop.
The South wall has a large industrial shelving unit that we got for free. It holds all of our electrical and plumbing supplies, bins various house parts that I don't want to lose, and some smaller projects in process. See the basement bathroom medicine cabinet on the lower shelf?
I store my clamps on one of the side rails.
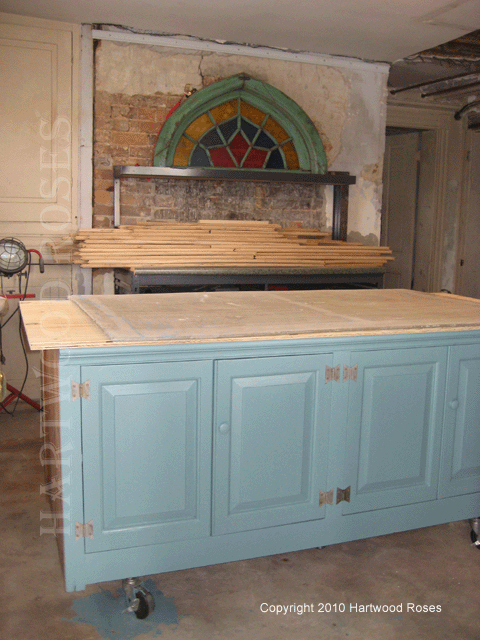
The East wall, where the fireplace is bricked in, holds a steel workbench with drawers and a laminate top ... got it on Craig's List for almost nothing.
The wood stacked on the bench top is old maple basketball floor (Craig's List, for free), that I plan to use to make countertops.
The drawers hold hand tools (like screwdrivers, pliers, and the like). All of the power tools, are arranged on the bottom shelf.
The North wall is a bit of a hodge-podge still. The steel shelves were left here by the previous owners, and I'm using them now to hold paint and gardening supplies, and tubs of assorted stuff I still don't know what to do with.
The star of the space is the work island. I made it from two old-school kitchen cabinets (Craig's List again ... thanks, Robin!), it's my very favorite thing in the whole room.
I attached the cabinets back to back, installed locking casters underneath (free, again), and screwed on a 3/4" plywood top. That's a piece of concrete tile backer board (left over from another project) sitting on top in this photo ... it's a great work surface. I have a detailed post HERE with a tutorial to show you how I built the island.
This is what the workshop looks like as you walk in from the Hall.
What do you think?
(written by Hartwood Roses. Hartwood Roses blog.)


