Monday, January 31, 2011

One World, One Heart ... The Great Worldwide Blog Tour

Thank you VERY much for stopping by to visit me in Hartwood today.  This post is an introduction, meant for visitors who are here for the first time, or for regulars who might have missed something along the way, and it is my participation in the One World One Heart worldwide blog event.


Hartwood is a small village in north central Virginia (USA) ... not a village in the most literal sense, you understand ... it's really only a Post Office, a church, and a bunch of farms.  It's a very beautiful, very rural place to live, and I love it here.

This is our house.  It was built in 1848.


This blog started two years ago as a way for me to document what was happening in my rose gardens and at my rose nursery.  I grow 900 different types of heirloom and modern roses, and there always seemed to be something to interesting going on.  As I learned about my roses, I wanted to share what I learned on my blog.  (A few weeks ago, I did a post about how to prune and train rambler roses, for example.)

This is not a fake photo.  It's what my Rose Field REALLY looks like in May and June.


I love photography, and my roses are very willing subjects.  During warm weather, I can often be found outdoors photographing my gardens.  I can think of no better way to spend a day than being surrounded by roses.  My pets are also featured in my photos.  We currently have 4 indoor cats, 1 outdoor cat, and 2 retired racing greyhounds.  (I worked in greyhound rescue for many years.  Friends and I now run Greyhounds Rock, a nonprofit charity that raises money for canine cancer treatment and research.  The link to our web site is on my sidebar.)

This is my friend Kim's dog, TJ, who is currently undergoing treatment for Osteosarcoma (bone cancer).


As time went by, I began to include a bit of history and some DIY with respect to the restoration of our old house.  We bought this house in 2002, and we spent 5 full years on a whole house renovation before we could move in.  I was the general contractor, I did all of the design work, and I did much of the demolition, paint stripping, and carpentry work myself.  This is my dream house, in my dream location, and I feel blessed to wake up here every morning.  Things are far from finished, so sometimes I have blog posts devoted to construction and decorating projects, as well as subjects specific to old house issues.  (I did a tutorial in a post just last week about how to install a subway tile backsplash.)  Take a look at the sidebar, and you will find links to blog posts that introduced some of the rooms of our house, our barn, and the evolution of the house itself.

A really bad flash photo of me, say "Cheese", taken by the Husband ... as I was working to cut and install the top of my rolling work island.  Click HERE to see the full post.


As part of the One World, One Heart event, each participating blog is offering a giveaway to the readers who visit.  To celebrate warmth of our Hartwood country setting, I am offering item an item designed to chase away the winter chill ... a hand-crocheted scarf, with roses (of course) will be sent to the lucky winner.


Everyone who has a blog is eligible to enter.  Leave a comment on this post, including a way for me to contact you ... it's as simple as that.  I will draw the winner and contact them on the evening of February 17.


Thank you, again, for stopping by to visit.  If you like what you see, I would be honored to have you come back to visit again from time to time. Hartwood is a beautiful, friendly place, and I try to share that feeling to my readers.

Sincerely,
Connie

P.S.  I post here at least every day or two.  This post is going to get a little bit stale, as One World One Heart continues through February 17th.  If you want, click HERE to go to my most recent post and you can see what else is going on around here.

This giveway is now closed.  Thank you, all of you, for dropping by to see what my blog is all about.

Sunday, January 30, 2011

Sunday Snapshot ... The Perfect Cat Window

This is a favorite place for our cats to hang out.  Our window sills in this old house are 13" deep, so there is plenty of room for a small cat bed in the family room's south-facing window ... right above the radiator.


Here is Dorothy, lounging in the cat bed, watching birds in the snowy trees outside.  Life is good here if you're a cat.

Be sure to come by tomorrow morning to see my contribution for the "One World One Heart" blog tour, including a giveaway.  Never heard of it, you say?  Click HERE for details.

Have a great weekend!
Connie

Friday, January 28, 2011

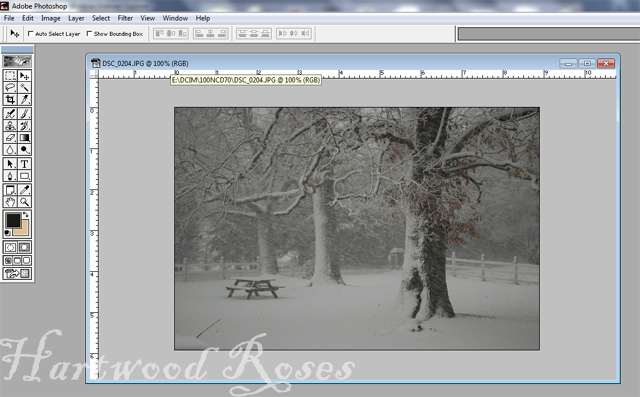
PhotoShop Lesson: Accentuating Snowy Trees

Thank you for all of the lovely compliments on my snow photos yesterday.  Most of the success of these photos was because the light during the snowstorm was completely perfect.  All I had to do was adjust the White Balance on my camera, frame the shots, and click away. 

When I loaded the memory card into my laptop to view the photos, I decided that they could use a little bit of tweaking, a lot like I did when I used to develop photos in the darkroom in the Dark Ages of film photography.  It was a simple matter to use PhotoShop to darken the trees, increase the contrast, and sharpen up the blowing snow.

Here is what the photo of the three trees looked like straight out of the camera.  It's okay, but I knew it could be better.


After we finish with it, it will look like this:


Open the photo in PhotoShop.  The first thing I did was adjust the size of the image to 640 x 480, so I was working on the image in its actual size.


To adjust the levels to darken the trees, Click 'Image',  'Adjust',  'Levels'.


And you get a pop-up window that looks like this.  Click on the black eyedropper icon, then click somewhere on the photo that you want to tell PhotoShop should be true black.  I clicked on the center of the hollow part of the front tree.  If you don't get the result you want when you click on the photo the first time, click around until you like what you see.  If you totally hate the results, click Cancel and close the window, and your photo will remain unchanged.


My next step was to increase the white range (Don't quote me on this terminology, because I don't know if that's what it's really called.)  Again, click to adjust the Levels.  This time, I grabbed the white-point slider and I moved it until I liked what I saw.


To make a sharper contrast between the lights and the darks, click 'Image', 'Adjust', 'Brightness/Contrast'.  Click and hold the sliders, and drag them where you think the photo looks best.  I brightened the photo a bit, and increased the contrast considerably.


If you look at the original photo, you see that I had to deal with the pesky issue of my daughter's car antenna in the lower left corner.  This distraction was dispatched fairly quickly with a few strokes of the PhotoShop airbrush.  (I can show you how to use airbrushing later, if there's interest.)  The "H" on my Hartwood Roses watermark disguised the fact that there was ever an antenna in the picture.


The last step is to sharpen the photo, to accentuate the texture and details, and to focus on the emotion of the blowing snow.  Click 'Filter', 'Sharpen', 'Sharpen'.


That's all there is to it!


I use PhotoShop 6.0, which is the oldest version of PhotoShop that will run on my new laptop.  There are newer versions out there, but they are considerably different than what I'm used to and I didn't want to have to learn how to use them.  I have never used any other photo program besides PhotoShop, but I imagine that the concept of adjusting levels and contrast and sharpening images is similar no matter what program you have.

Class is over.  Any questions?

Thursday, January 27, 2011

Snow Day

Our area was hit by a weird storm yesterday.  We had cold rain for most of the day, sleet in the afternoon, and heavy snow in the evening.  There is about 4 inches of snow on the ground now.  


The news yesterday and this morning is full of stories of people trapped in traffic trying to get home as the weather made the roads more and more impassable. 


We were prepared for a day stuck at home today ... it's not really "stuck", though, because all of my favorite things and favorite people are here with me.


I made vegetable soup for dinner last night.  Snow days always make me hungry for something that stews in a pot on the stove ... and homemade soup always tastes better the next day as leftovers for lunch.


I went to Lowes yesterday afternoon before the snow started falling, and I now have all my supplies to finish tiling the backsplash in the kitchen, so I can hopefully cross this project off my every-growing To Do list.

Thank you for all of your lovely sentiments and well wishes for my daughter and her wedding.  As I told many of you via email, we are VERY EXCITED about this!  (If you didn't receive an email reply, it's because the only email address I have for you is noreply-comment@blogger.com.  Please consider making your email visible ... I'll help you with it, if you want.)

Wednesday, January 26, 2011

A Joyous Announcement!!

Our youngest daughter is getting married.

She and her fiancee (who is a great guy, BTW) spent a a few days in New York during the week before Christmas.  They did typical New-York-at-Christmas stuff, including trying to freeze themselves silly standing out in the cold at the Plaza for The Today Show ... but they got on TV, and they talked to the weather lady.

Please forgive the fuzzy DVR screen capture.  It's the best I could do.


Most of the wedding plans are already in place.  The ceremony and reception will be here in early June.  The roses are in full bloom in early June ... though this had no bearing on their choice of the date ... it's just a wonderful coincidence. 

It's been a while since we did anything about the garden here at the blog, so how about a preview of what wedding guests can expect in the garden on the day of the wedding.  (All of these photos were taken in 2009 or 2010, right around the same date as the wedding will be.)


'American Pillar'


'Dupuy-Jamain'


"Maggie" and 'Champneys' Pink Cluster'


'Zephirine Drouhin'


'Champneys' Pink Cluster'


The Rose Tunnel in the center of the Rose Field should look like this ...


... and the ceremony will be in front of our pavillion, under the spreading branches of our ancient pecan tree, which is adjacent to THIS:


As you might imagine, the mother of the bride is going to be working herself into a frenzy ... getting the garden into shape for this event.  I'm so excited!!!!  (and I have SOOO much work to do.)

Monday, January 24, 2011

Things You Don't Know ...

Over the past couple of weeks, two thoughtful bloggers I recently discovered passed The Stylish Blogger Award to me.  I offer my most sincere gratitude for this recognition to Cindy of Custom Comforts and Michele of My Notting Hill.


The terms of this award require that I now share with you seven things about myself ... isn't that what I do here all the time?  Let's see what I can come up with that you'll find interesting ...


1.  Our house is the only place The Husband and I have lived in since our marriage in 1980 that is not a new structure.  Really.  I worked with all of our other houses to add old-house details and architectural interest  ... no need to do that here.

2.  I am the oldest of three children, and I truly like the company of my siblings.

3.  I am allergic to cats ... but not as much now as I was when I was younger.  Antihistamines are your friend.

4.  I went to college to become a teacher, but I decided that being a Mom was a better career choice for me.  When I want to teach, now I do it my own way ... by presenting a gardening program, mentoring a new gardener, posting a blog tutorial, etc.

5.  I try to avoid working on ladders ... they scare me.  Same with electricity.  Electricians are magic.

6.  My favorite music is heavy metal or hard rock, played really loud.  I also love Motown.  I don't hear too well out of my left ear. 

7.  I have always been a gardener, but I didn't start ROSE gardening until 2002.  I'm a quick learner.  :)

I am now supposed to pass this award to other bloggers who I admire, but I can't really narrow it down like this without feeling like I'm leaving someone out or hurting someone's feelings.  I read and enjoy each of the blogs you see on my Blog List on the sidebar to your right.  Do me a favor ... scroll down the list and check out one of the blogs over there that you have never visited before.  Be sure to tell them that I sent you.  :)

Thank you for thinking of me, Cindy and Michele.  This was fun!

Sunday, January 23, 2011

Sunday Snapshot ... A Blast from the Past

Imagine my surprise, as I sat on the sofa on Friday evening watching the Barrett Jackson auction on TV, when I looked up and saw THIS on the screen:


This car is EXACTLY like one we owned while our children were little.  Yes, folks, this was the ultimate grocery-getter, Mom Mobile, and fastest, baddest thing on the streets of Fredericksburg at the time. 


I stared at the fire-engine red paint, the black convertible top, the chrome wheels, and the completely-huge 455 cu.in engine for the minute or so that the car was on the auction block ... and it brought back such wonderful memories.  We could tell from what they showed that this wasn't OUR car ... I wonder where it is now?

Have a lovely weekend!

Friday, January 21, 2011

Workday Weekend Tutorial: Tiling the Backsplash

( This old post continues to get a huge number of hits each week.  Be sure to leave a comment to tell me how you discovered it and if it is helpful to you.   I will be happy to do what I can to answer any questions via email ... my email address is in my profile)

This project has been on my To Do list longer than any other, I do believe.  We remodeled our kitchen five years ago, as part of the never-ending renovation of our historic house, and I have had the tile on hand since then. 

The tiles I'm using are 3" x 6" handmade subway tiles.  I love how each tile is ever-so-slightly different, creating a pleasingly imperfect look.  See how carefully they were packaged.  The tiles are stacked back to back, with cardboard spacers to protect them and to keep the faces from rubbing against each other.


Here is what the backsplash looked like before I started yesterday morning.  (It has looked like this for five full years.) 


After I cleared the counters, and taped down resin paper over the counters to protect them, and I gathered my tools.  It doesn't take many tools.


Rows of tiles MUST be level, so it's important to start with a level base.  If your counters are installed correctly, they are already level ... double check just to be sure.


For backsplashes, I use premixed tile mastic.  It's easy to work with, and it's perfect for laying tile on walls.  Mastic is NEVER to be used in showers or anywhere that gets wet ... for showers, use thinset.  Because my tiles are thick, I used a 1/4" notched trowel to apply the mastic to each tile.  You can apply the mastic to the wall instead, but be careful not to work in too large an area, or the mastic can skin over and begin to dry before you get tile on all of it.

The ridges created by the trowel apply the exact right amount of mastic to the tile.  When you squoosh the tile in place on the wall, the ridges also create suction which holds the tile in place instantly.


I started laying tile on the outside corner, using a running bond pattern, laying the first row from the corner outwards working in both directions.  Bullnose tiles create a smooth transition around the corner.  The tiles are slightly beveled, creating a roughly 1/8" to 1/16" space for grout between each tile when set in place ... the perfect spacing for subway tiles!


Running Bond pattern simply means that tiles are laid like bricks.  Because these tiles are handmade, some of them didn't sit exactly straight ... I used little pieces of folded cardboard as shims, when necessary if things looked cock-eyed.


The second row is laid with the center of each tile exactly over the space between the tiles in the previous row.  I use a ruler to mark the center on the first tile, to make sure everything is perfect.


The first two rows went on very quickly.  On row three, I had electrical outlets and switches to work around.  Here is a quick lesson to show you how I mark and cut the tiles around outlets and switches.  (Marking is much more accurate than measuring.) 

Before working near ANY electricity, ALWAYS turn off the power at the breaker box and test it to make sure it is OFF!

1.  Hold the tile in place and mark the vertical edge of the electrical box on the top edge of the tile with a pencil.


2.  Now make a mark on the side of the tile below the screw and about in the middle of the ears that secure the switch/outlet.


3.  Use these marks to draw lines to show where to cut, to notch the tile to fit around the outlet.  (Yes, this is my quilt ruler.  It's super handy for making perfectly straight, perpendicular and parallel lines.)


4.  I cut tile with a wet saw set up in our basement garage.  This little saw was probably the best $89 I ever spent!  In the 9 years I have had it, this saw and I have tiled countless backsplashes, three bathrooms, and acres of floor.


To set the tile in place, I loosen the screws that hold the outlet to the box, and slip the tile behind the outlet's ears.  This brings the outlet forward to the level of the new tile.  After the mastic is set, I retighten the screws and replace the outlet cover.


Perfect!


I kept setting tile, working toward the inside corner.


Here's another obstacle.


The last tile in each row must be cut to fit accurately into the inside corner.  To turn the corner and start on the adjacent wall, I think it looks best to keep some symmetry by matching short pieces to short pieces and long pieces to long pieces in each row ... if that makes sense.  Here's a picture so you can see what I mean.


Almost finished.  Each tile on the top row had to have about 1/8" cut off so it would fit underneath the upper cabinets.  This was really time consuming!


I finished off the end of the counter with a short side-splash, using bullnose tiles to transition cleanly to the wall.  I don't have any extra of these tiles with the bullnose on the long side, and I can't get any more, so I was a nervous wreck while marking and cutting this miter joint.


At the end of today, this is what the right-hand side of the kitchen looked like:


I ran out of mastic, just as I put the last tile in place on the side-splash.  Tomorrow, I will go to the store to get more and I will try to finish the tile on the other side of the kitchen ... which I will show you in the next installment of this project ... when we learn how to GROUT!

Tiling isn't difficult.  If you have any questions, or want some clarification, be sure to let me know.  I will answer any and all questions the best I can.

Related Posts with Thumbnails