Showing posts with label Workshop. Show all posts

Monday, January 28, 2013

Working on the Workshop

Even before I had to move everything around in my basement workshop to gain access to dig out and repair our water main last week, the room was a mess.  It has shelves and cabinets and lots of flat surfaces that collect all sorts of crap ... whether it's crap that belongs in a workshop or not.  I need to reorganize things in there and try to concoct some sort of system that will reduce the likelihood of this type of mess in the future. 

My dream would be to have a workshop where there is a place for everything and everything is in its place ... but I'm realistic enough to admit that this will probably never happen.  At the very least, I will be satisfied with having a general idea of where to look for most of my tools and supplies.

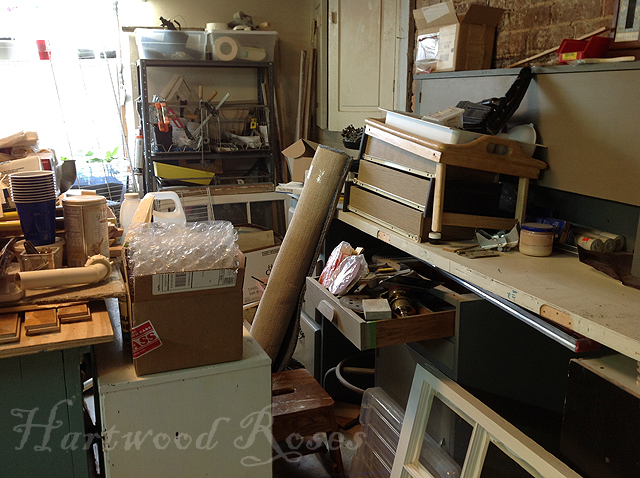
Today, I concentrated my efforts on the east wall of the workshop.  When I started, that area looked like this:


So much of this is stuff is here because it was displaced by the water main work.  Other things have been sitting there for weeks.
 
Doesn't the scene remind you of the photos that the original archaeologists took in King Tut's tomb?


This wall is supposed to be a work space with cabinets above it.  The way I had the various cabinets and things arranged just wasn't working, though.  It took a few hour's work, a quick trip to the Habitat ReStore for another kitchen drawer base cabinet, and some rearranging of things I already had.  I'm really pleased with what I ended up with.


I have had these yellow cupboards forever, and they have just been sitting around without a purpose.  For now, I will use them upside down like this, just sitting on the counter top ... till I figure out if it is possible to mount them securely to the soft brick wall.
 
There you have it.  It's a start, and I still have a LONG way to go till this room is acceptable.  The top of my work island is still piled high with all sorts of stuff  ... I'm okay with that for now, because I know that I will (hopefully) put it to rights very soon.

Wednesday, July 6, 2011

The Big Green Cupboard Is Home!

The disorganization in my basement workshop has reached a crisis level.  As we have worked on other basement projects, we have absolutely trashed my once-organized workshop.  Some of it was necessary, because we had to clear out a wall to do the plumbing work for the bathroom, and we cleared things again to repair the plumbing leak in the ceiling of the workshop earlier this year.  Things weren't put back properly either time.

It is to the point where I practically have to play 'Where's Waldo' to gather the tools and supplies to do any sort of project.  I needed more storage space, and the big green cupboard in the basement of my in-laws' former house is one solution.


I first introduced you to this cupboard in THIS post from February.  My father-in-law built it out of 3/4" plywood, and it is heavy, heavy, HEAVY.  In order for The Husband and I to carry it out of the basement and load it into our truck, we first took off all the doors.


It was still heavy, but at least it we could lift it like this without hurting ourselves.  Here it is loaded into the truck for the trip to its new home.


We have the perfect place for it along the back wall of our basement workshop.  It fits right between some pipes in the corner and the edge of the window ... almost like it was made for this spot.  We raised it off the floor with bricks and shims, and screwed it to the wall ... so it won't fall over and crush someone.

The cupboard is 6 feet high and 5 1/2 feet wide.


Look at all this space!  Now, imagine it filled with bins of screws, and scrapers, and all sorts of other tools and supplies.  A place for everything, and everything in its place ... that's what I'm aiming for.


Now I don't have an excuse to avoid tackling this.  (Viewer discretion is advised ... this next photo is may be upsetting.)


I will work at it a little at a time, and eventually I'll get the place whipped into shape.

Wish me luck.

Wednesday, February 24, 2010

The Basement Workshop.

I'm fortunate to have space inside the house (even if it is in the cold, scary basement) with enough room to store my tools and work on projects.  I don't know what this room was when our house was built in 1848, but it became the kitchen when the house was remodeled in the 1930's.  The kitchen moved upstairs to the main level of the house in the late 1960's, and the now-former basement kitchen became a storage room.

This project is a perfect example of having to make a situation worse before you can make it better.  The space looked solid, but tired ... but we had to almost completely demolish it to correct some serious problems.

Here is a quick tour, clockwise around the room, with some photos approximately before and during demolition.  I say 'approximately' because I neglected (once again) to take the "before" photos before I demolished stuff. 

Southwest Corner.


The vertical stain on the wall by the window was the scene of one of the scariest electrical discoveries I've made while working here.


The metal electrical box had rusted completely away inside the wall ... and I had been using that outlet just a few minutes before!


After some more demolition, we had this:


West Wall.


North Wall.


Built-in Cupboard on the East Wall.


Bricked-up Fireplace.


South Wall.  The left door goes to the laundry room; the right door goes to the hall.


Hall door, again.


One of the prior owners of our house laid strip oak flooring down on sleepers throughout the basement ... wood floor in the basement?  What were they thinking?  There was vinyl floor glued to the wood floor in the workshop space.


We used a digging iron to remove the flooring, taking it up piece by piece ... revealing old concrete.


The floor along the South wall had a trench cut into it, that had been used to run plumbing to the kitchen, basement bathroom, and laundry room.  Until we figure out whether we'll need to use the trench, too, we just covered it up with 3/4" plywood.


Once the room was stripped of the deteriorating plaster and wallboard, we installed new lighting and some new electrical outlets ... and it was time to begin to turn it into a real working workshop.

The South wall has a large industrial shelving unit that we got for free. It holds all of our electrical and plumbing supplies, bins various house parts that I don't want to lose, and some smaller projects in process. See the basement bathroom medicine cabinet on the lower shelf?


I store my clamps on one of the side rails.


The East wall, where the fireplace is bricked in, holds a steel workbench with drawers and a laminate top ... got it on Craig's List for almost nothing.


The wood stacked on the bench top is old maple basketball floor (Craig's List, for free), that I plan to use to make countertops. 


The drawers hold hand tools (like screwdrivers, pliers, and the like).  All of the power tools, are arranged on the bottom shelf. 


The North wall is a bit of a hodge-podge still.  The steel shelves were left here by the previous owners, and I'm using them now to hold paint and gardening supplies, and tubs of assorted stuff I still don't know what to do with.


The star of the space is the work island.  I made it from two old-school kitchen cabinets (Craig's List again ... thanks, Robin!), it's my very favorite thing in the whole room.


I attached the cabinets back to back, installed locking casters underneath (free, again), and screwed on a 3/4" plywood top.  That's a piece of concrete tile backer board (left over from another project) sitting on top in this photo ... it's a great work surface.  I have a detailed post HERE with a tutorial to show you how I built the island.


This is what the workshop looks like as you walk in from the Hall. 


What do you think?


(written by Hartwood Roses.  Hartwood Roses blog.)

Thursday, February 4, 2010

A Little of This, and That

More snow fell two nights ago, adding three more inches to what was left from Saturday's storm.  Temperatures are warmer, though, so the driveway and sidewalk melted and dried nicely after Steve cleared the snow early yesterday.  The weather-guys are talking about some sort of major snow event for tomorrow and Saturday ... I don't even want to think about it.

In case you aren't tired of snow photos yet, here's one I took through the dining room window early yesterday morning.  I really liked the contrast between the black branches of the pecan tree, the white snow, and the foggy sky.  (You'd think that I used some sort of fancy PhotoShop technique ... nope.  The camera's autofocus accidently focused on the window screen instead of the tree.)


Try as I may, I haven't been able to adequately capture the unbelievable size of this tree with a camera.  The trunk is 10 feet around!  You have to stand beneath it to fully understand how huge it is. 


As much as you'll hear me whine about winter, I'm not sure that I'm really ready for spring to arrive.  (I received an email from a fellow blogger the other day, and she said this same thing.  Hi, Jayme.)  There are days when I feel almost paralyzed by cabin fever, but I am mostly enjoying the down time from the garden ... and concentrating on the long-neglected renovation of our house.


I have so many projects that I'm working on right now.  You've already seen what's going on in the basement bathroom ... if you missed it, click here.  Steve is downstairs right now, removing the damaged portion of the galvanized drain pipe.  He already cut the drain for the clawfoot tub, so we can remove it and demo the remainder of the walls.  My part of the project for now is to continue to hunt for a cool sink and design the cabinetry.


Here's today's progress:


The old wall framing is gone.


and Steve cut off the deteriorated part of the old drain pipe. 


One project I haven't shown you yet is what we're doing in the basement workshop.  Soon, I'll do a detailed post on the work island I'm building ... until then, here's a sneak peek to make you curious.  (I swear, sometimes my workshop looks like those photos of King Tut's tomb with all that stuff packed to the ceiling.)


There's plenty of nursery-related stuff that I have to get finished before spring.  The greenhouse is inventoried, so I know which varieties are going to be offered this coming season ... now I have to gather photos of them and write descriptions for the online store.  This year, I'm toying with the idea of designing a downloadable color catalog.  (If I spend the time to do this, is it something that you think would be helpful?)


I already some speaking engagements scheduled.  For one of them, I will probably debut a new presentation, so I have to work on that, too.


Finally, I have the not-so-fun part of the business to attend to.  I'm finishing up my year-end accounting, so we can file our taxes early for once.  Then I can get my supply list in order, and I will start to shop for the best prices for the bulk items I use ... like potting soil, perlite, pots, shipping boxes, etc.


Overall, I am very excited to see what spring brings when it comes.  For now, I hope to see how productive I can be with other things. 

I'm going down to the basement to work now.

(written by Hartwood Roses.  Hartwood Roses blog)
Related Posts with Thumbnails