Showing posts with label Basement Bathroom. Show all posts

Friday, October 8, 2010

Basement Bathroom Renovation ... The Big Reveal!!!

It's time to reveal the new, and much improved, bathroom in our basement.  This project took SOOO much longer than it was supposed to, but the results are spectacular, I almost don't mind all the delays.  Without further ado, I give you .... the REVEAL!!!


Before I go any further, let me bring those of you who may be unfamiliar with this project up to date.  When we bought this house in 2002, it had 5 full bathrooms ... three upstairs with bedrooms, one on the main floor adjacent to the office, and one in the basement.  The plumbing in the basement bathroom leaked, so we disconnected the fixtures, closed the door, and vowed to renovate it after we did most of the rest of the house.  Early this year, we decided that it was a problem not having a bathroom we could access without going through the finished living space of the house.  We've been stomping through the upper floors whenever we had to use the 'facilities', removing dirty boots or tracking stuff through the house.  I also wanted to have a bathroom that was more easily accessible for guests when I have garden gatherings here.  The basement bathroom was our answer, and I wanted to make it pretty, while acknowledging its original construction in the 1940's.

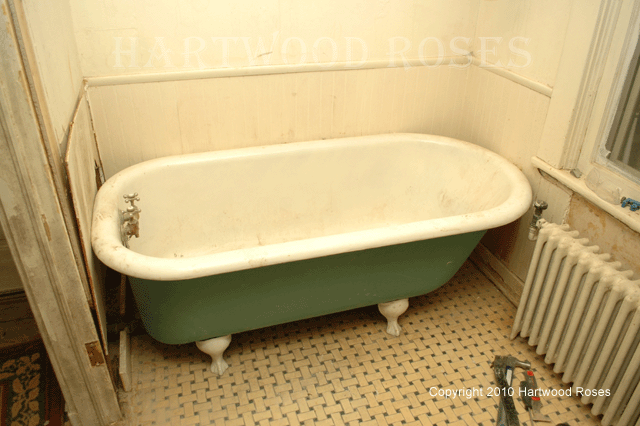
In the beginning, this room had a clawfoot tub, a broken pedestal sink, and a toilet that leaked ... and lots of exposed plumbing.  We demolished everything to the studs, tossed the toilet and sink, gave away the tub, and started fresh.  What once looked like this:


Now looks like this:


The other side of the room was this:


And now, it's this:


We decided early on that we didn't NEED to keep 5 full bathrooms in this house.  The clawfoot tub was in good shape, but we wanted storage and display space instead.  The tub went to a friend's house in Maryland one day last spring, I found this cupboard at Luckett's Store, and it's perfect!  (For the story of my trip taking the tub to to its new home, click HERE.  To see the trip to Luckett's, click HERE.)

Here's what the bathroom looked like all stripped down, as you looked at it from the hall ...

The window had a lovely view into our garage, it didn't let in much light, and we removed it.


This is the same view now ...

 (The only thing I have left to do is to install the door casing and rehang the bathroom door.  Let's pretend I've done that already.)


The bathroom has all new plumbing and electric.  The water lines, drain pipes, and radiator lines, which used to be exposed, are now hidden in the walls where they belong ... and no more leaky supply fittings!  There's a new light where the old light was, and we added an electrical outlet (which the bathroom didn't have before).


(The new light, as seen in the store display)


 Isn't it perfect?


You can see the medicine chest, all restored and installed in its new spot.  It was a flea market find from a few years ago, probably dates from the same time period as our bathroom, and I love all its Art Deco rounded edges!  What once looked like this:

(The dirty, gross 'Before' photo)


is now a wonderful addition to this vintage-inspired bath.

I left its original beveled mirror ... streaks and flakes and all.


The vanity is brand new, and its mahogany finish and curvy porcelain top blend perfectly with the Vintage vibe I was going for in this room. 


The style of the chrome faucet adds a bit of a contemporary flair, with porcelain handles that keep the Vintage feel.


The sink wall, stripped to the original brick wall of the house, looked like this as we finished the framing and began to add insulation.  All of those bulkheads were necessary to conceal the new plumbing in the walls.


And now it looks like this.


The star of the room is the step-back cupboard.  The size is perfect (it sits in exactly the same space where the clawfoot tub once did) and I love everything about it!  All I did to it was give it a good cleaning (it needed it!), remove the contact paper and wallpaper from the inside, and paint the inside with one of my current favorite colors (BM 'Paladian Blue').  The shelves of the upper part of the cupboard provide great display space for part of my collection of random country-style stuff ... a perfectly fitting display for a country cupboard, don't you think.


The crate says, "VA DAIRY CO."  I love to collect local stuff!!


The sign says, "A friend is someone who believes in you when you have ceased to believe in yourself."


This shelf is a tribute to my dear friend Kat.  I bought the duck pins while shopping with her one day at The Vintage Source.  When the Husband and I were at Luckett's picking up the cupboard, I spotted a basket of duck pin bowling balls, and I bought one for Kat and one for me.  The rose tray was a gift from Kat ... it had once been her mother's, and she sent it to me knowing it would have a good home here.  (I get teary just thinking about it.)


The flowers in the vase on the cupboard came from my garden yesterday afternoon.  I have never claimed to have much floral arranging ability, and I admire those of you who do, but it's hard for someone with even my limited talent to go wrong with so many beautiful roses to choose from.


1. Wagon Wheel Bright Pink,  2. New Dawn,  3. Comtesse de Segur,  4. Gartendirektor Otto Linne, and some Queen Anne's Lace.


1. Mme. Desire Giraud,  2. Sequoia Ballet,  3. Elina,  4.  Comtesse de Segur.


1. Puerto Rico,  2. Sequoia Ballet,  3. La Marne


1.  Not-September Morn,  2.  Alba Meideland,  3.  Snow White,  4. Souvenir de la Malmaisson.


Mr. Lincoln, and some pretty weeds, in a bud vase on the sink.


Except for the aforementioned bathroom door, this room is completely finished.  Yesterday, as I was channeling Gumby in all sorts of twisted, uncomfortable positions taking these photos in this small room, I marveled at the transformation.  I hope you enjoyed the tour as much as I LOVE our new bathroom.

(If you are itching to see details on the construction, vanity, floor, etc., click the 'Basement Bathroom' label below to get a list of all the blog posts about this bathroom project.)


Wednesday, July 7, 2010

Don't Try This at Home

Our extreme heat for the past few days has forced me to work on indoor projects.  Project #1 on my mind is still the basement bathroom.  (No, it's not finished yet ... but I'm getting closer.)  I painted the walls and ceiling yesterday.  Yesterday's item on the To Do list was cleaning the floor ... the only original feature in the room that was fit to save.

What it looked like before the demolition began.


A close-up of the filthy floor.


The floor is encaustic tile (a super hard, matte finish tile, where the color goes all the way through), and it had every assortment of dirt, crud, rust, and whatever else on it.  To make it worse, the drywall guy didn't use a drop cloth, so there was drywall dust ground into the grout.

In this photo, I've already scrubbed the upper right corner.


Here is my arsenal of floor cleaning supplies.

You're not seeing things ... that IS a palm sander.


I tried the usual floor cleaning products, and was dissatisfied with the results.  The crud was really stubborn.  In desperation, I tried 220-grit sandpaper with a spritz of 409 ... it worked!!


Scrubbing the floor with sandpaper by hand was going to take WAY too long ... so that's when I grabbed the sander.  This is definitely not a suggested use for this particular power tool.  It reminds me of a teeny little floor buffer.

This is miles better than it looked before cleaning ... pretty good for a 70-year-old floor, don't you think?


It's still taking a while to get the floor clean.  There are paint splotches and drips from prior paint jobs, and other crud that requires scraping.  After scrubbing with the sander, the final step is to use a scrub brush and work the last of the caked drywall dust out of the grout.

I should have the floor all finished by later today.  Next step:  baseboard and door molding!

(written by Hartwood Roses.  Hartwood Roses blog)

Wednesday, April 14, 2010

More Progress in the Basement Bathroom

This weekend was a a very productive one.  The basement bathroom is now completely framed, insulated, vacuumed, and ready for drywall. 

(If you're not familiar with our basement bathroom project, you can come up to speed with these links:  Episode 1, Episode 2, Episode 3.)


Framing finished, and insulation well under way.


We test-fitted the vanity and sink, and found that it was 37 inches tall!!  The thing looked like it was standing on its tippy-toes, and it completely overpowered the small space.  (forgot to take a picture of this ... here's the one I took in the store.)

(Why didn't we notice this before?)


The only answer, because we both love the style of the sink, was to take a saw to our brand new vanity and cut 5 inches off the legs.  To make sure the cuts on those fluted, round feet were straight and perfectly level, we built a jig out of scrap 2 x 4's.


Clamped it onto the vanity with LONG pipe clamps ...


... and did the deed (very carefully) with a hand saw.  I was unbelievably nervous about doing this ... no turning back now.


Ta Da!!


This looks much better now.  It has almost the same proportions as an antique wash stand, which fits perfectly with the mood I'm aiming for in here.

Big finial feet are now cute little fluted bun feet.


The drywall is being delivered this afternoon, and the guys will get started hanging and finishing it in a day or two.  It should be ready for primer by early next week.

My goal for this project is to have a pretty bathroom with a functioning toilet by the time of the first private garden party here on May 23.  It's looking like I may make it, with plenty of time to spare. 

(written by Hartwood Roses.  Hartwood Roses blog)

Saturday, March 13, 2010

The Basement Bathroom ... continued.

As happens with most of my projects here, the rebuilding of our basement bathroom has taken a turn away from my original vision. 

Let's step back a minute, and bring you up to date.

This is what we started with:


The only things within this space that are staying are the basketweave floor and the radiator.


This is where we stand as of today:


I love the wood sheathing on the walls ... it has sort of an 'out house' look about it.  That's the air conditioning duct hanging in the corner.  It will be tucked back up into the ceiling, when we get a ceiling again.


While the husband was finishing the demolition of the bathroom itself, he decided to go ahead and remove the walls in the hall and the closet, too. 


You can see the original back wall of the house here in the hall and inside the closet.


We're going to leave the brick exposed in hall, but frame and drywall inside the closet.


Here's the floor inside the closet ... the strip-oak flooring, and the floor joists laid directly on the dirt, are visible through these access panels.  (Not to worry, those electric wires are disconnected already.)


Originally, I wanted to use a sink like this:


I should have bought this sink when I saw it at Caravati's last year, but I didn't.  All I took away from there that day was this photo.  After talking it over with the husband, he wasn't too keen on such a utilitarian look for the bathroom, so two weeks ago we ordered this from Home Depot:


Here is the faucet we chose:


This is the medicine cabinet that I'm refinishing.  It's all stripped of paint now, ready to be painted and reinstalled.


With this light.


I'm still not sure what to do with the walls.  I have two ideas.  I found this paint chip at Home Depot in its new Martha Stewart line.


It's called Toasted Marshmallow, and it matches the floor tile perfectly.  (This photo makes the sample look too gray.  It's actually a lovely pale creamy gold.)  If I go this way, I think it would look wonderful to do a gallery wall full of my collection of antique wall mirrors.  (No photos of the mirrors, sorry.  They're stored in the attic of the detached garage ..and it's raining ... I hope you understand)

I still like this cat print.  Maybe I can work it in somehow.


My other idea is to wallpaper the walls.  I love this paper that I found on eBay.  It comes in red or yellow.


I'm going to order samples to see if either of these colors will work.  With this kind of strong pattern on the walls, I wouldn't need anything else, I think.  (I love doing bold and unexpected things in small spaces.)


I still plan to build a cupboard sort of like this where the bathtub was.  As of now, I'm leaning toward a distressed black finish with red underpainting showing through.


But, I could change my mind. 

(written by Hartwood Roses.  Hartwood Roses blog.)
Related Posts with Thumbnails