Saturday, February 27, 2010

Back to the Workshop ... How I Made the Rolling Work Island.

Did you see the reveal of my now-clean-and-organized basement workshop earlier this week?  With all the projects we have around here, it's important for me to have a place with work surfaces, storage for tools, and some room left over to store projects in process.

Today, I'll show you how I built the rolling Work Island.


I am going to preface this post by saying that I originally had no intention of putting any of this on the blog ...  that's why I didn't bother to take any true 'before' photos.  In a perfect bloggy world, I would have photographed the components from every conceivable angle and detailed exactly how I prepared it all.

I'm far from perfect, so I'll start with what I do have.

You have to use your imagination and picture this as two old-school, built-in-place kitchen cabinets. The lady I bought them from got them at an estate auction. As soon as I saw them, I knew that they would make an incredible work island.


Here is the first photo I have of the process ..... I know, I know, the project is well under way by this point.  The cabinets are flipped onto their tops, and they are clamped together with pipe clamps.  This is a good example of why you can never have too many clamps.  


This scrap of wood is screwed on to hold everything in alignment.  Next step, the base and wheels:


The base is a piece of 1/2" plywood with two 2 x 4's screwed to it ... it used to be the bottom of a weird bookcase/cabinet that was here in the basement.  This gives a nice firm foundation for the cabinets to sit on, and a secure place to mount the casters.


We scrounged these big locking casters last year.  I got the other parts from the plumbing dept. at Lowes. 
I attached the flanges to the 2 x 4's,
screwed on the 6" pipe nipples,
slipped in the casters,
and the husband helped me flip this now-very-heavy cabinet up onto its new wheels.


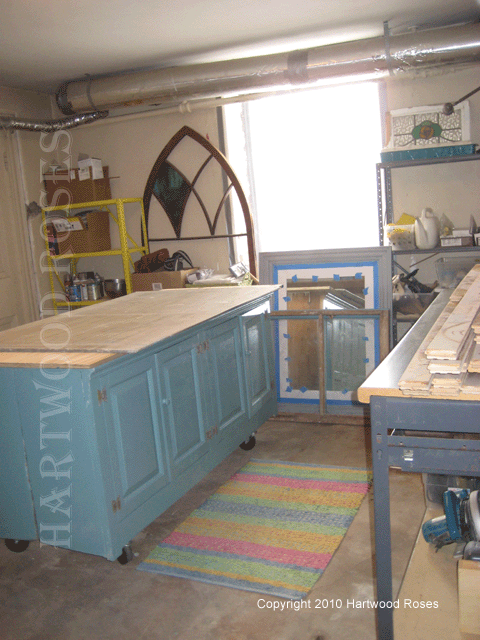
Ta Dah!!  The island sits at the perfect height for working, and it can be rolled out of the way whenever I need to.


See how the cabinets were originally scribed to fit what must have been a kitchen with a huge slope in the floor ... a closed-in porch, perhaps?


Here it is with a straight-edge for perspective.


The top is a piece of left-over 3/4" plywood, screwed down with 2" deck screws.  (You can see a bit of the soon-to-be-clean-and-organized workshop behind and around me ... before I did much of the cleaning up.)


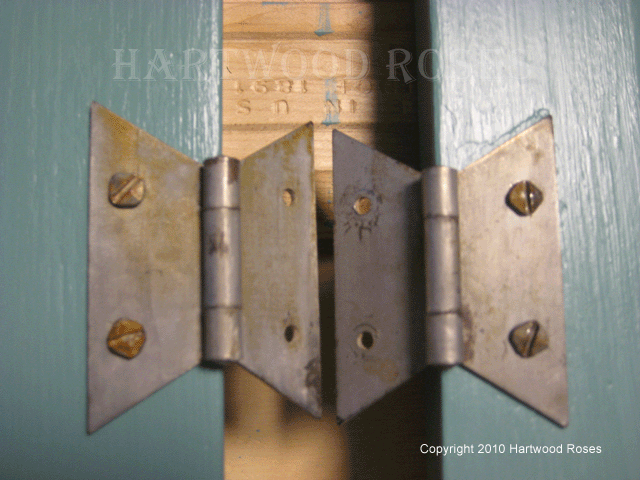
I took off the doors (labeling each one so I knew where to put them back), and removed the hardware.  The hinges were covered with who-knows-how-many coats of paint ... remember what I said in an earlier bathroom postDon't Paint the Hardware!  Future owners of your creations will thank you.


Next, it was time to sand the carcass of the island and the doors to feather out the chipped places and provide a firm surface for the new paint.  While the white was nice, I like this better:


It's a beautiful greyish turquoise blue.  There isn't a color name to give you, because I had it color matched from a Kilz paint chip.


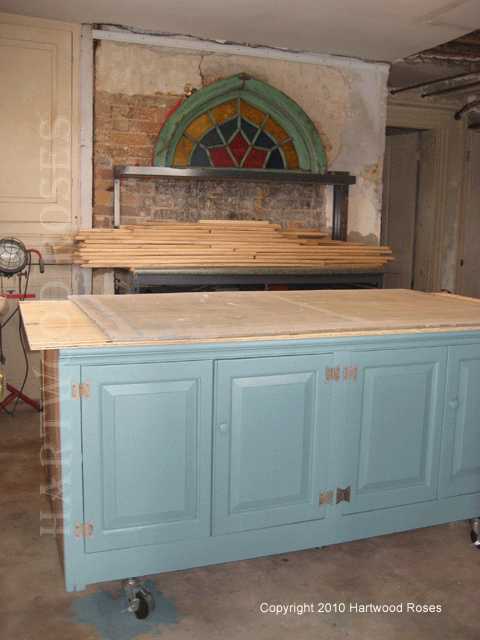
Two coats of paint, and this is the result.  (Look at the floor and you can see what happened when I accidently kicked over the can of paint.  Oops.)


I love the slightly rusty patina that the hinges have after their little 'spa treatment' in a dish of paint stripper.  Aren't those square-head screws cool?


There weren't any backs on the cabinets.  Attaching them together created one big, open space inside.  The shelves themselves were pretty cruddy, so I decided that shelf paper was the answer.


I found a pattern at Big Lots that has the perfect coordinating shade of turquoise in it.


All that's really left to do is to finish the top.  I did a quick mock-up to show what it will look like once I install some of my salvaged maple basketball floor.  The top is a project that is more involved than the time I have available right now ... I'll grab the compressor and the nail gun and take care of it soon (famous last words).


Here's the grand total:

2 Kitchen Cabinets:  $75 on Craig's List
Plywood for the base and top:  Free
Locking Casters:  Free
Flanges and Pipe Nipples:  $25
Paint:  $12
Shelf paper:  $6
Maple Basketball Floor:  Free
Total .... about $118.


Now I have a super useful work island, with tons of storage.  I feel more productive already.


Friday, February 26, 2010

Fake Flowers on Friday

I'm going to do something a bit different this week for Flowers on Friday.

There is a message thread on the Garden Web Antique Rose forum about how Jackson & Perkins is faking the photos in their catalog.  The photo shown there is particularly deceitful, and it bears no resemblance to what a gardener can expect from the rose if they grow it in their garden.  After seeing this, I spent a little while on the J&P web site to see how many other fake photos I could find.

My grandson's favorite thing right now is hunting for objects on the pages of "I Spy" books.  For this Friday's Flowers, I offer my own version of "I Spy", using Jackson & Perkins' catalog photos.  How many fake flowers can you find in each photo?  Remember, sometimes the flower is flipped, and it may be resized.  Every time I look at these, I see ones that I didn't see the last time.

(All of the photos in this post came directly from the Jackson & Perkins web site.  They are not altered by me in any way.)


This Double Delight tree rose is a really good example of some very crude 'enhancement'.  How many flowers can you find that are identical to each other?   


Here's Happy Chappy.  More roses 'stamped' here and there to create the illusion of wall-to-wall flowers.


Ditto.  How about this 'cluster' of flowers on Social Climber.


Is this 'supposed' view of Ingrid Bergman fooling anyone?


I hardly know where to start with this one of Lavender Simplicity.


How about High Society on an arch?  It looks like these roses were cut out with Kindergarten scissors and glued on with school paste. 


Doesn't it look like someone stuck a bouquet of florist roses on this Victorian Trellis?  Some of the stems aren't even attached to anything.


Flowers from top to bottom, neatly arranged growing vertically on an arch?  Fiction!  Notice how every one of them faces the "camera" angle ... there are none on the 'back side' of the arrangement.  Make no mistake, it is an arrangement.


Speaking of arrangements, look how the same image of a pink rose was used over and over in this arrangement.


Here are their Bulb Gardens, currently on clearance.  Never mind the fact that tulips, daffodils, hyacinths, and muscari do not bloom at the same time ... you will see as you look at the next few photos, they used the same flower images in each arrangement.  Fake, fake, fake.


I'll leave you this Friday with an image that I found particularly disturbing.


For $19.95 (3 for $54.93, or 6 for $104.94) Jackson & Perkins will sell you a 3-inch pot of Japanese Honeysuckle.  This is the very same Japanese Honeysuckle that is choking the countryside and invading our gardens.  I wish I could tell you how much of this scourge I grubbed out as we cleared our neglected property to design the gardens.

This should be illegal.  Is there someone I can report it to?

(written by Hartwood Roses.  Hartwood Roses blog.)

Wednesday, February 24, 2010

The Basement Workshop.

I'm fortunate to have space inside the house (even if it is in the cold, scary basement) with enough room to store my tools and work on projects.  I don't know what this room was when our house was built in 1848, but it became the kitchen when the house was remodeled in the 1930's.  The kitchen moved upstairs to the main level of the house in the late 1960's, and the now-former basement kitchen became a storage room.

This project is a perfect example of having to make a situation worse before you can make it better.  The space looked solid, but tired ... but we had to almost completely demolish it to correct some serious problems.

Here is a quick tour, clockwise around the room, with some photos approximately before and during demolition.  I say 'approximately' because I neglected (once again) to take the "before" photos before I demolished stuff. 

Southwest Corner.


The vertical stain on the wall by the window was the scene of one of the scariest electrical discoveries I've made while working here.


The metal electrical box had rusted completely away inside the wall ... and I had been using that outlet just a few minutes before!


After some more demolition, we had this:


West Wall.


North Wall.


Built-in Cupboard on the East Wall.


Bricked-up Fireplace.


South Wall.  The left door goes to the laundry room; the right door goes to the hall.


Hall door, again.


One of the prior owners of our house laid strip oak flooring down on sleepers throughout the basement ... wood floor in the basement?  What were they thinking?  There was vinyl floor glued to the wood floor in the workshop space.


We used a digging iron to remove the flooring, taking it up piece by piece ... revealing old concrete.


The floor along the South wall had a trench cut into it, that had been used to run plumbing to the kitchen, basement bathroom, and laundry room.  Until we figure out whether we'll need to use the trench, too, we just covered it up with 3/4" plywood.


Once the room was stripped of the deteriorating plaster and wallboard, we installed new lighting and some new electrical outlets ... and it was time to begin to turn it into a real working workshop.

The South wall has a large industrial shelving unit that we got for free. It holds all of our electrical and plumbing supplies, bins various house parts that I don't want to lose, and some smaller projects in process. See the basement bathroom medicine cabinet on the lower shelf?


I store my clamps on one of the side rails.


The East wall, where the fireplace is bricked in, holds a steel workbench with drawers and a laminate top ... got it on Craig's List for almost nothing.


The wood stacked on the bench top is old maple basketball floor (Craig's List, for free), that I plan to use to make countertops. 


The drawers hold hand tools (like screwdrivers, pliers, and the like).  All of the power tools, are arranged on the bottom shelf. 


The North wall is a bit of a hodge-podge still.  The steel shelves were left here by the previous owners, and I'm using them now to hold paint and gardening supplies, and tubs of assorted stuff I still don't know what to do with.


The star of the space is the work island.  I made it from two old-school kitchen cabinets (Craig's List again ... thanks, Robin!), it's my very favorite thing in the whole room.


I attached the cabinets back to back, installed locking casters underneath (free, again), and screwed on a 3/4" plywood top.  That's a piece of concrete tile backer board (left over from another project) sitting on top in this photo ... it's a great work surface.  I have a detailed post HERE with a tutorial to show you how I built the island.


This is what the workshop looks like as you walk in from the Hall. 


What do you think?


(written by Hartwood Roses.  Hartwood Roses blog.)
Related Posts with Thumbnails