Tuesday, March 31, 2015

Blooming in the Basement ... Single Pink China

The cuttings that I took at Monticello's Tufton Farm last October are growing like crazy under their lights on the shelves in my basement workshop.  A few of the cuttings have buds, which I will leave in place so I can confirm that each plant still has its correct identity on the label.  More important than this is the joy that I get from seeing these tiny plants (ones that I started from a stick and a prayer) grow and push out buds and flowers.


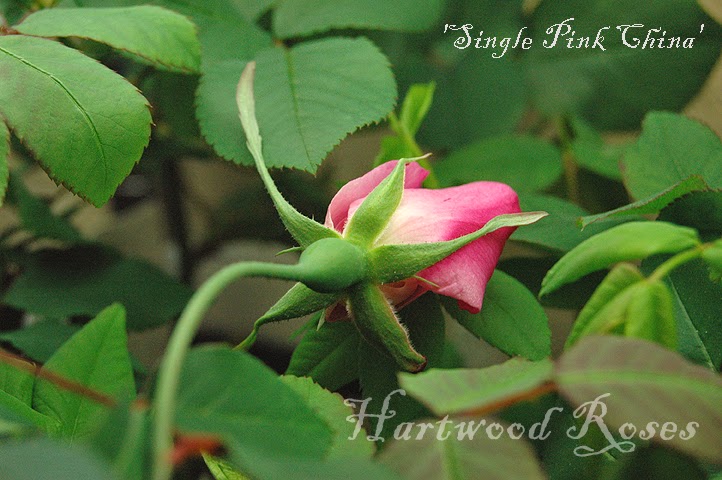
The flower that opened this morning is on a plant of 'Single Pink China'.  'Single Pink China' is a very rare rose, thought to be a sport of 'Old Blush'.  The plants themselves are very much alike in the garden ... but 'Old Blush' has semi-double flowers and flowers on 'Single Pink China' have a single row of five petals.  As far as I know, there is no nursery in the US that sells this rose.


Five delicate petals on this flower, with a couple of quirky petaloids that many single-flowered roses have.  I could have groomed those out, but I didn't


It's still too early for me to begin the process of hardening these babies off to life on the outside, as they are only accustomed to my cool basement (around 55 degrees most of the time).  To be honest, I probably could start the in-and-out cycle of taking the pots outside during the day, then bringing them back inside at night, but I don't want to risk forgetting about them outside one evening while nights are still getting to or below freezing.    


My main mission with propagating these rare roses is to distribute them to gardens in other places to help insure that they don't disappear.  With this in mind, eight varieties of these roses in the basement (this one included) will be securely packaged and winging their way to a friend later today.

Bon Voyage, little rose!

Monday, March 30, 2015

The Weekend's "Big Flea" Finds

My husband and I went to the "Fredericksburg Big Flea", a once-per-year huge antique/collectibles show at the Fredericksburg Expo Center, on Saturday morning.  We took our time going up and down the aisles in the show room, but nothing seemed awesome enough to buy until we were in the last aisle.  Here is what we bought:


As soon as I saw the carefully-framed remains of this sampler from 1805, I knew that I HAD to have it.  Even in this condition, the precise stitches are a work of art.  To be honest, I think I love it MORE in this tattered state than I would have if it were whole.


Sarah Murray and her numbers and alphabets.


dated 1805


I have a huge collection of vintage and antique postcards.  My ones of sites in Fredericksburg are matted and framed, and I used to have them hanging in the family room in our past houses.  When I saw a dealer with postcards at the Big Flea on Saturday, I checked the Richmond, Virginia, section to see what he had from Hollywood Cemetery.


Three of the five postcards we bought were unused.


One of President Monroe's tomb, and two of the Jefferson Davis family lot.


One of the Davis postcards, copyright 1905, shows landscaping that appears to contain rose bushes!


The other two postcards are my favorite type to find, ones that were used and mailed and contain a message and an address.  This one shows President Monroe's tomb, and it was mailed to Miss Mollie Knight in Luray, Virginia, in 1907.


This last one shows a lily pond that once was part of the landscape near the entrance of Hollywood Cemetery.  I have never seen this image before, and I am thrilled to have it!  It was mailed to Miss Florence Riker in Martinsburg, West Virginia, in 1909.


Next time I go to Hollywood Cemetery, I will bring these along with me and I will try to photograph the same scenes.

There was other great stuff at the show, but this is all we brought home with us.  Being in the mood to downsize, declutter, and simplify puts a whole different mood on shopping at an antique show.  I look at things and appreciate them, and only items that I absolutely LOVE make the cut ... which, I guess, is how it should be all the time.

Friday, March 27, 2015

Finished and Out the Door: The Grey Dining Hutch

This grey dining hutch was hanging around our house since early last year.  I bought it at Goodwill.  It was filthy and reeked of cigarette smoke, but it was in good condition otherwise ... perfect for a makeover and a quick resale ... or so I thought.


Dorothy and Alice think that they're helping.


The filth and stink was remedied with a good scrubbing and sitting it in the sunshine for a few days.


I discovered while I was working on the hutch last winter (in my dining room, using the dining table as a workbench, because it was too cold at the time to paint in my basement workshop), that it is a perfect match for our Blue Buffet ... except the hutch is oak and the buffet is maple.


The  hutch and buffet were both made by Cochrane.


The body of the hutch is Annie Sloan's 'Paris Grey', and the inside is 'Old White' ... very lightly distressed and clear waxed.  I stripped the oak top and refinished it with clear oil-based polyurethane for durability, and replaced the colonial-style fake brass hardware with brushed nickel knobs and bin-pull handles.


This hutch was one of the stars of my booth at the Lucketts Fair last May.  I wish I had kept count of how many people were lured into the booth and ooohed and aahhhed over it ... saying that the hutch was beautiful, my price was fantastic, then walking away.  My husband is an expert salesman, and even HE couldn't convince anyone to take it home with them.  At the end the weekend, the hutch came back home with us.  (To be fair, I wasn't the only one with this problem.  There was very little actual buying going on at last year's fair, according to the other vendors that I talked with, and a lot of us took home pieces that we had been certain would sell quickly.  Live and learn.)


That little vanity with the Bakelite handles is still available, too.


The hutch was stored in the living room before the Fair, and it returned to the same spot afterward ... and there it sat for months and months ... and I went on to other things.


Last month, in the spirit of continuing to work on finishing what I start, I listed the hutch on Craigslist to see what would happen.  In about a week, I received an email from a nice lady who was very interested in buying it.  Bad weather and scheduling conflicts got in the way for a while, but we remained in contact via email and telephone and we finally worked out a day when she could come by.  She loved it, of course, and she told me that it is exactly what she has been looking for!  It's a small world, because this little hutch now lives in the same neighborhood as my parents, around the corner and about two blocks away.

I still have a lot of leftover stuff in the basement and garage from when I was painting and selling.  Getting a large item like this hutch out of the house is an accomplishment ... baby steps, one thing at a time, finish what I start ... I'm working on it.

Thursday, March 26, 2015

Way Back Machine ... The Year 2000

In 2000, we had just moved to a new home ... 4000+ square feet of boring beige, builder-grade fixtures and finishes.  One of the first things that I tackled was designing and building bookshelves around the fireplace in the family room.

Last week, while I was sifting through photo files on my computer looking for something else, I came across this photo.  Two of our daughters appear to have been keeping themselves occupied by using a crimping iron on each other's hair ... then they took photos to document the very-crimpy results.  Look who's background ...


There I am, screwing drywall onto the frame of one of the bookshelf sections.  I finished these off by adding casing molding and corner blocks to the face of the units, and installed a three-piece crown molding above.

Those built-ins were a real booger to design, because the self-contained, ugly-ass fireplace stuck WAY out into the room and the window you see was only about six inches from the corner.  Inspiration struck one day as I was staring at the problem, and I designed pairs of bookshelf towers that started a few inches away from the side walls and stepped out into the room.  The wall above the fireplace itself was built out eight inches or so from the wall, to better blend the fireplace into the space.


This is what the built-ins looked like when we lived there.


This is how the next owners styled the shelves, as seen in a listing photo from when they were selling the house in 2013.  (more listing photos in THIS post.)


I finally did find the photos that I had originally been digging through.  It took longer than I thought, since I got distracted by my little trip down memory lane.

Wednesday, March 25, 2015

Ready .... Get Set .... SPRING!

Spring is my busiest season.  This is to be expected, since it's the time when I work to get my garden cleaned up from winter and prepared for its big 'show' in early summer.  Hollywood Cemetery is my other garden, and last Saturday's volunteer day was a big success.  The roses at Hollywood are definitely ready for their close up!

This is also the time when garden clubs want programs about roses ... did one last week, and I have another one to do in April.  These require at least a few hours of preparation.  I always spend an hour or two (or more) going over the PowerPoint portion of the talk, refining it and doing what I can to make it better.

In addition to garden things, I slave away at my sewing machine to stock the inventory of handmade collars for Greyhounds Rock.  Our first booth at an event will be during this coming weekend (March 28 and 29), at the Fredericksburg 'Rites of Spring' wine festival.

With all of this going on, it was particularly appropriate the other morning to see a sunbeam illuminating one of my favorite needlepoint pillows.


Believe it or not, this IS a more simplified life for me ... as I am working to strip down to pretty much only what I really WANT and NEED to do.  I'm not one to sit for very long ... you already know that I'm happiest when I'm active.  After being cooped up inside for most of the winter, it feels wonderful to be outside in the sunshine doing physical work.  This is a good thing, since there is a LOT of work around here to be done.

I have to try to remember ... 

One thing at a time.

Finish what I start.

It's a process ... directing my energy toward the completion of a project, instead of scattering my attention all over the place all the time.  I'm better at this than I was ... and I'm not as good at it as I will be in the future.  

Sunday, March 22, 2015

Sunday Snapshot ... Hollywood Cemetery Rose Work Day

Saturday was the day that I look forward to, and plan for, all year ... the day when volunteers gather to provide annual maintenance to approximately 100 of the roses at Richmond's Hollywood Cemetery.  The weather was glorious, the volunteers were excited to be a part of the event, and the roses are always better for the pruning and attention that they receive.  I love coordinating the event ... and I am always very relieved and exhausted when it's over.

This year, I took two photos ... two ... that's all.  I left my camera in my car, because I didn't want to haul it around and/or worry about it while I was working. 


I didn't take a photo of this rose before we started on it.  The "Crenshaw Musk Rose" is one of the most historically significant roses at Hollywood Cemetery.  It didn't look its best last year because I forgot to do any work on it ... there were weeds growing around and through it, and lots of winter-killed and bloomed out canes clogging the plant.  It took us almost two hours to do this, as three of us carefully worked our way from the bottom to top, outside to inside, evaluating and reshaping the entire plant.


Pruning like this is appropriate for a vigorous, repeat flowering rose like the Musk Rose.  It maintains the rounded, upright shape of this rose.  I would never do this to Hollywood's once-blooming roses like the Hybrid Chinas and free-standing ramblers ... it would ruin their shape and rob them of most of their personality.  (Yes, I believe that roses have personalities.)

The staff at Hollywood Cemetery does a great job of helping me prepare for the arrival of the volunteers, and the Friends of Hollywood provides yummy boxed lunches for everyone.  I ate mine in the sunshine, while chatting with some of the volunteers.


At the end of the day, I was spent.  Goth Gardener was there, as she promised.  We ended the day with another Silly Selfie ... one that documents our extreme level of fatigue.


It is such a relief to be finished with this.  There are a few roses that didn't get worked on, and I will inspect and do what I can for them in the next couple of weeks, and review and document the other roses to help prepare for next year's Rose Day.  

My attention now will be to focus on my OWN garden.  I'm energized and raring to go ... once I rest up from yesterday.

Happy sunny Sunday, Everybody.

***********************
Sunday Snapshots are posts that are devoted to a moment in time that represents a slice of life in Hartwood, or wherever else I happen to be.

Friday, March 20, 2015

Meet My New Friend

Whenever I notice that this blog has a new follower, I click over and check them out.  I figure that whoever it is probably wants to follow along because they have an interest in at least some of the same things that I do ... could be another blog/person that I want to follow, too.

I know exactly where the Goth Gardener was standing when she took this photo of 'Mrs. B. R. Cant' at Hollywood Cemetery.


One of these new followers has a blog called "Goth Gardening" ... the writer lives in Richmond, loves Hollywood Cemetery, and her writing indicated to me that she is probably a person that I would like to get to know in person.  She came up to Fredericksburg to be in the audience for my presentation to the Master Gardeners on Wednesday.  Afterward, we walked to a coffee shop and spent the whole rest of the afternoon camped at a corner table chatting, and totally losing track of time.


Another cutting of my Yellow Seedling had a flower, and I brought it with me to the meeting.


She even got me to agree without protest to do the Silly Selfie, as she calls it.


Her post about our day together is way more entertaining than this one.  Click HERE to run over to her blog to read what she had to say.  I will see her again tomorrow, as part of the crew of volunteers for my rose work day at Hollywood Cemetery ... and I will see her as often as I can in the future.  She's definitely a keeper!

Tuesday, March 17, 2015

The Best Saint Patrick's Day Decor

I had a hair appointment this morning in downtown Fredericksburg.  Afterward, I treated myself to a dozen glazed donut holes from Paul's Bakery (a yummy local landmark).  This was their Saint Patrick's Day decoration on the corner of the counter ...


Hastily snapped iPhone photo.


... a green cake donut with icing and green and white sprinkles, and a big bite out of it, on top of a can of Guinness!  

I don't have a drop of Irish in me that I know of, but my husband and children do.  On their behalf, allow me to wish all of you a very happy Saint Patrick's Day.

Monday, March 16, 2015

Roses 101

That's the title of the program that I wrote to teach the basics of how to choose and grow roses.  I am presenting it later this week in downtown Fredericksburg, for the monthly meeting of the local master gardener group.


Here are the particulars, as published in the newspaper:


Master Gardener General Membership Meeting (open to the public) 
Date: Wednesday, March 18, 2015 
Time: 12:30pm  NOTE:  Daytime meeting

Location:  Central Rappahannock Library Theater Room,  1201 Caroline Street, Fredericksburg. VA 22401

Speaker:  Connie Hilker, an expert on historic roses and is a member of the Board of Trustees of the Heritage Rose Foundation.  Connie’s overall message is that ‘roses are not rocket science’ and she strives to show that anyone with a basic knowledge of gardening can choose appropriate roses and grow them well.   She presently has over 700 varieties of roses in her garden!  

Title:  Roses 101

A one hour program with the intent to take the mystery and confusion out of growing roses. Covers the basics about different types of roses, where to plant them, how to care for them, and what to do about rose pests and diseases in order to keep them healthy.

*********************
The meeting is free and open to the public, and everyone who wants to learn more about roses is encouraged to attend.  The talk lasts for about an hour, and there will be more than enough time for questions afterward.  My goal is to give everyone in the audience the power to go home and grow roses without fear.

Sunday, March 15, 2015

Sunday Snapshot: An Ideal Spot to Nap

When I first walked into this house (during the real estate tour before we bought the place) I knew that this south-facing window in the family room would be perfect a perfect hang-out spot for the cats.


Alice on the windowsill and Maggie roasting herself on the radiator.


There are birds and squirrels to watch outside, sunshine in abundance (unless it's cloudy), and a toasty radiator (in season, of course).  

The little Persian rug that Maggie is sleeping on is a new acquisition.  I found it at a local antique store last weekend.  Turns out that it coordinates perfectly with the new drapes ... almost as if I planned it that way.  (Who buys vintage handwoven rugs for their cats?  That would be me.)

Happy sunny Sunday morning, Everybody!

***********************
Sunday Snapshots are posts that are devoted to a moment in time that represents a slice of life in Hartwood, or wherever else I happen to be.

Thursday, March 12, 2015

Hey, Connie, How Did You Hang the Drapes in Your Bay Window?

The bay window in our Family Room presented a challenge when it came to hanging drapes.


I wanted stationary gathered panels at the corners of the bay, to coordinate with the way the drapes hang on the other window in the room ... traditional fabric and construction, and a more modern way to use them.  What kind of rod and hardware would accomplish this, tho?

When I was at Ikea buying my drapery rods, I found this handy little accessory.


It's rubbery with some sort of armature inside of it, it's threaded to screw onto the Hugad drapery rods, and it's made to bend around corners!


I combined the black rod with these white brackets.  I wanted the hardware to virtually disappear ... the bracket itself stayed white to match the window framework and trim, and I used black spray paint on the hook that holds the rod.


The side brackets are mounted to the face of the window frame, as far toward the wall as I could get them ...


Took this photo before I added the second screw that holds the bracket.


... and I installed one bracket in the center of the bay to hold the curved part of the rod assembly.


The bracket kit comes with a little slide-on thingie that covers the screws and helps make the bracket that much more subtle.


The rod bridges the space between the bracket and the side wall, so the drapes can be all the way against the wall into the corner of the bay.


I came up with a rather unconventional solution to the challenge of exactly how to get the drapery panels pushed all the way into the corner.  They are rod pocket drapes, and the bracket hook would act as a stop and would keep the drapes from sliding all the way into the corner.  To overcome this, I measured the distance from the hook to the wall, gathered the drapes onto a rod and marked this distance onto the gathered drapes with a pin, and cut an access hole into the back of the rod pocket.


When I put the drapes onto the rod, and the rod onto the bracket hook, I clipped the rod to the hook through this hole and the drapes hang perfectly.  If I hadn't told you what I did, you would never know that this is how I made this work.

I have another fantastic trick to show you, one that I learned in THIS post from Design du Monde ... use a zip tie, the same color as the rod, to hold stationary panels back and keep them from ungathering.  You absolutely can't see the zip tie unless you're craning your neck to see behind the drapes, and the drapes stay exactly where they're supposed to.


(Step-by-step photo tutorial to show you how I made the drapes is HERE.)

With this project complete, I can now move onto other things.  Spring is sending signals that I hope I interpret to mean that it will be here soon.  It seems like it's been a longer-than-normal winter, and I'm really ready to get outside and get my hands dirty.  I have roses to prune, mulch to lay, gardens to plan ... and I can't wait to get to it!

Tuesday, March 10, 2015

How to Make Custom, Professional-Looking Lined Drapes

If you can use a sewing machine to sew a relatively straight seam, and you can operate an iron, you absolutely CAN make your own custom drapes!  These instructions will show you exactly how I made the drapes for our dining room and family room, step by step.

(This is a long post, and it may be of little interest to those of you who don't sew.  My intent is that these instructions can float around on the 'Web, and may one day help someone, somewhere, who wants to make THEIR own drapes, but doesn't how to do it.)


My drapes have a rod pocket, with a two-inch header, and they hang from ceiling to floor on a curtain rod that's one-inch in diameter.  The fabric I used is Waverly's "Tucker Resist", which is 54 inches wide and has an 18-inch pattern repeat.  Lining is economy drapery lining fabric, also 54 inches wide.


Let's get started:

The 54-inch width of this fabric is more than adequate to have nice full-looking panels on each side of my windows.  Let's do some measuring and some easy math to figure out how long to cut the fabric and lining for each panel.  Using my room and measurements, and rounding up to the nearest inch, we have:

Ceiling Height:  114"
Header and Rod Pocket:  5"
Hem Allowance:  5"
Total:  124 inches

(I allow a few extra inches of fabric, just to be safe.  It's much better for the drapes to be too long, and to be cut down during the hemming process, than to find that I miscalculated and that they're too short.)


Cut the selvage edge off of the drapery fabric.


Cut the lining fabric 4 inches narrower than the drapery fabric ... you'll see why in a minute.


Beginning at the top of the panel, with right sides together, sew the drapery fabric and lining fabric together at the sides.  Stop your seam about 18" from the bottom edge of the fabric.


Press the seam allowance toward the drapery fabric.


The reason you cut the lining narrower than the drapery fabric is because the drapery fabric wraps around to the lining side by about an inch, which gives your drapes a very professional look.


Sew the top edge of the drapes, right sides together with the extra drapery fabric evenly divided on both side edges, as shown in the photos above and below.


Turn your panel right side out, and iron it so the drapery fabric wraps evenly on both side edges.


Top stitch close to the side seam, until you get to where you stopped your stitching at the bottom of the panel.


Now, let's mark and sew the header and rod pocket.  I used my quilt ruler and a pencil, marking a line on the right side of the fabric, four-and-a-half inches from the top edge (2 inches for the header + 2-1/2 inches for the rod pocket)


Fold the panel on the pencil line to the wrong side and iron it smooth.  Sew one line of stitching close to the edge of the folded part to define the bottom of the rod pocket.  Then run a second line of stitching two inches from the top edge to form the header and top edge of the rod pocket.


The piece of tattered masking tape on my sewing machine is my 2" mark.


The sides and top of the drapes are finished!  All that's left is to mark and sew the hem.

I like to mark the hem on my drapes with them hanging from the rod.  I don't want to take a chance of measuring it wrong.  As a bonus, this is the time to step back and admire all of my hard work .... you have to imagine me going oooh and aahhh, because this was the first time that I had a chance to see what the drapes looked like in place in the Family Room bay window.


Having gone to the trouble of installing the rod and hanging the drapes, I was hesitant to take them back down to work on the hem after I marked it ... so I dragged my iron, ironing board, and sewing machine downstairs, set up a folding table, and finished these drapes right where they were.


Alice was supervising.


When hemming the panels, the drapery fabric and the lining each have their own hems.  The photos and directions below explain in detail how to do this.  (sewing the side seams short like I did is part of this process.)  

Let's hem the drapery fabric first.

I used pins to mark where the fabric hit the floor at the bottom of the baseboard, folding and ironing the drapery fabric on a line 1/2" shorter than this.


Pins mark the length at the floor.


I totally forgot to photograph this next part ... bear with me and follow the diagram.  For a four-inch hem, draw a pencil line four inches from the bottom edge where you marked and ironed (this is Line 1), and another line one-inch from Line 1 (this is Line 2).  Cut off any extra fabric at Line 2.


Fold, iron, and sew the hem to the inside, along Line 1.

The lining fabric is marked, cut, and hemmed to be 2 1/2 inches shorter than the drapery fabric.  No photo here either, sorry again.  

Let's finish the sides at the bottom edge, and our drapes will be done.

At the ironing board, fold and press the drapery fabric over the lining, and pin it into place.


Stitch the overlap into place.


Begin your stitching where you left off in an earlier step.


The lining hangs free at the bottom, and is securely attached at the sides.


All finished!!


Why would I go to all this effort to make my own drapes?  Let's do the math.  I made eight drapery panels, four for the dining room and four for the family room.  Each panel is 9-1/2 feet long.  I paid $450 for Drapery Fabric (30 yards at $14.99 per yard, using a 50% off coupon at Hancock Fabrics) and $105 for Lining Fabric (30 yards at $3.49 per yard, using a 50% off coupon at Joann's), which brings the cost to few cents less than $70 for each panel.

Do you want to hang curtains in YOUR bay window, too?  Click HERE to see the nifty hardware that I used and how I did it.

I hope this tutorial has taken a bit of the mystery out of how to make drapes.  The finished product really DOES look professional, and you have the satisfaction of knowing that you did it yourself.  No kidding ... you really CAN do it.

If you are new here, just happening by or visiting from DIY by Design take a minute to look around.  For a brief tour of our Dining Room, click HERE.  To see the before, during, and after of the restoration of our Family Room, click HERE.

Related Posts with Thumbnails