Showing posts with label remodeling. Show all posts

Tuesday, January 8, 2013

Closet Construction, Days Four and Five

Today was Day Five of construction of our new-and-improved master bedroom closets.  I won't keep you in suspense, so let's start with a photo of what the closets looked like as the crew finished up this afternoon ... are you ready?

This is what we see now, as we walk down the hall and through our bedroom door.  All of the major construction is finished.  The only thing left for the crew to do is some minor sanding of the drywall and to install a few remaining pieces of molding.


Day Four (Monday) was all about taping and mudding the seams and patches on the drywall inside the closets.  Sam (drywall guy genius) arrived at lunchtime, and he was finished with the whole job by 7pm.  (that's what a professional can accomplish with fast-setting drywall compound.) 
 
Here is a peek at what the patches in the left closet looked like before Sam started.  I didn't take any photos while he was actually working, because I didn't want to get in his way and slow him down.
 
Strips of drywall patched in where the old closet walls once were.
 
 
Tuesday (Day Five) the whole project came together.  Before I knew it, all four of the doors were up and most of the molding was, too.
 
This is Peter, fiddling with the fit of the door to the right closet.
 
 
Still fiddling.
 
 
The top of the new wall has this lovely two-piece crown detail to finish it off at the ceiling.  My part of the job is to fill nail holes, caulk seams, and give everything a good paint job.


The new wall is built around the heating element of the baseboard radiator in this room, which continues into the closet.  I have to cut the radiator cover to fit, and work out some sort of trim to finish off the hole where it goes through the wall.
 
The block broke, but it's a clean break that will be easy to glue back into place.
 
 
Dorothy is inspecting the new space.  This is the right closet, which has all of its baseboard and inside door casing installed.


While working in the left closet, Peter ran out of baseboard molding.  I will pick up some more tomorrow and have it here when he comes for his last day.
 
Patching the floor is also one of my parts of this project.
 
 
All of the doors are now wearing the restored brass hinges that I told you about yesterday.  The two center doors are operable, and the two stationary outside doors have hinges for continuity and decoration only. 
 
I have quite a bit of work ahead of me to finish priming and painting the doors and molding.  It doesn't matter, because even seeing it like this makes me smile ... despite its unfinished appearance.  (I will wait to until all of the painting is finished before I install the restored doorknob hardware and glass knobs.) 


When Peter and his crew arrived five days ago, our wall of master bedroom closets looked like this.


Tonight, we have this!


I am thrilled with how it has turned out, and especially giddy about the promise of having all of our clothes visible and accessible in these new closets!


Thanks for following along to this point.  I will report back when I have progress to show on my portions of the project ... soon, I hope.
 
If you are just now joining us, click the links below to see the other posts that brought us to this point.
 
 
******************************
The work on this project was done by:
Peter Csemez
Homebrite Renovations
540-295-1337
(If you are in northern/central Virginia and you need a contractor, this one comes highly recommended ... by us!)
 

Sunday, January 6, 2013

Closet Construction, Day Three

Work on our new master bedroom closets progressed at a steady pace on Day Three.  They went from this:


To this:


The wiring is finished.  The drywall inside the closets is all up ... ready for Sam, the drywall finisher, to arrive on Monday.  (He is another person that we have worked with for years and years ... the best and nicest drywall/plaster guy in the whole state!)  All of the head scratching on Day Two paid off, and the doors and moldings look exactly like they do in my imagination.
 
Once Sam is finished, Peter and his crew will return to install the doors and put the baseboard and casing inside the closets.  (Painting everything and patching the floor are going to be my responsibility.)
 
Earlier today, I finished cleaning up the last of the salvaged door hardware that we are using.  Stay tuned for what I did and how I did it.
 
******************************
The work on this project is being done by:
Peter Csemez
Homebrite Renovations
540-295-1337
(If you are in northern/central Virginia and you need a contractor, this one comes highly recommended ... by us!)
 

Saturday, January 5, 2013

Closet Construction, Day Two

When we left this project at the end of Day One, our new bedroom walk-in closets looked like this.  (If you haven't seen the posts leading up to this, click HERE to see the design and HERE for Day One construction.)


Peter and his crew spent a bit of time at the beginning of Day Two scratching their heads and consulting with me about exactly how I wanted the doors and trim to go onto the new wall.  (My plan to clad the wall with doors and molding is nothing like regular construction, so I totally understand all the questions and head scratching.)  It didn't take long for everyone to agree on a plan of action ... and they got to it and things happened pretty quickly.
 
Here you see Peter and Corey working on the frame for one of the stationary doors, while Cecil cuts and fits pieces of drywall into the gaps left by the removal of the old closet walls.


I think this is still the part of the morning when they were scratching their heads.


The studs for the wall that divides the space into two closets is up, and this photo shows the boxes for the light switches are in place.


By the end of Day Two, all of the wiring was in place and the new walls were almost covered in sheetrock.


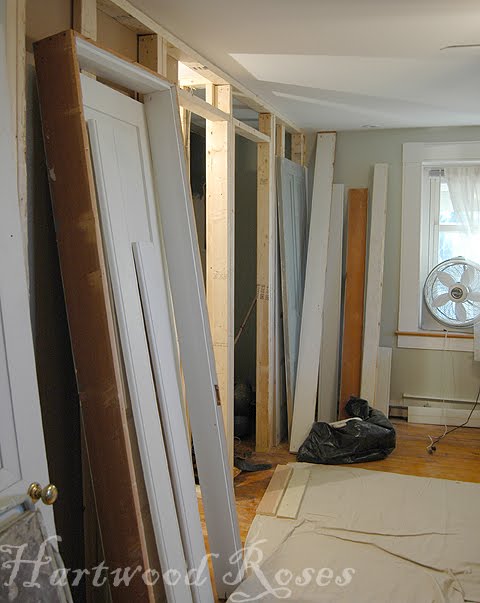
All of the doors and trim are staged for the beginning of their installation on Day Three.


Our bedroom is a mess ... but, even at this stage of the project, I can see what an improvement this is going to be.


When I was talking to Peter as he finished up work for the day, he told me that he had no idea that this would be such a complicated project.  The demolition of the old closets and the construction of the inside portion of the new closets is fairly conventional and straight-forward.  It's the design of the front wall, using salvaged doors and trim, that has been difficult.  I'm glad that he is the sort of person who enjoys (and welcomes) a good challenge. 
 
Stay tuned for Day Three.
 
******************************
The work on this project is being done by:
Peter Csemez
Homebrite Renovations
540-295-1337
(If you are in northern/central Virginia and you need a contractor, this one comes highly recommended ... by us!)

Friday, January 4, 2013

Closet Construction, Day One

Our contractor friend, Peter, and his crew arrived bright and early yesterday to start the construction of our master bedroom closets. They were scheduled to begin on Wednesday, but were delayed for one day.   Honestly, I was thankful for the extra day, because I had more preparation work to do than I realized. (Nothing in old house renovation is EVER as straight-forward as you think is should be.)

I made a slight change to the plan that I showed you earlier in the week.  Originally, the doors on the new wall were going to be arranged like this ... with the larger 30-inch doors opening into the new closets, and the smaller 24-inch doors were stationary.


Now, the wall will look like this.


... and here it is on the floorplan.  Using the smaller doors as the operating doors takes up less floorspace in the room, and I think the wall will be more visually balanced with this arrangement.


This is sort of what the area looked like when they started work on Thursday morning.  (After I took this photo, we removed the rest of the closet system and stripped off the wallpaper.)


Most of the Day One was spent demolishing the existing closet walls.  These things were built to last, and taking them out was more of a job than any of us realized.
 
First, Peter removed all of the moldings.  We are reusing these pieces in the new design, so he had to be extremely careful.


Then it was time to resort to power tools to cut away the closet walls.


Our bedroom is in the 1967 addition of our 1848 house.  Removing the wall between the two closets exposed a sliver of the original back wall of our house!  We won't keep it exposed, but it was neat to see it.


With the demolition complete, it was time for them to begin constructing the frame of the front wall.  To get into our bedroom, you have to go up a set of stairs and around a sharp corner in a narrow hall.  It was impossible to use this route to bring in the 12-foot 2x4s that form the top and bottom plate of the new wall. This is a resourceful crew ... and they used a rope to hoist the wood up the side of the house and through our bedroom window.
 
See the rope?
 
 
The animals are dealing with the upheaval and the noise of construction in their own ways. Ruby and Alice and Maggie have been pretty normal ... Daniel and Dorothy are a bit anxious.
 
Dorothy was already on the dog bed in The Husband's office when Daniel came in to 'hide'.

 
 At the end of the Day One, it was great to see the framework of our new closets taking shape.  


With the wall in place (though it's unfinished), it was great to know that the loss of 28 inches of bedroom floorspace isn't a big deal.  The new wall, in line with the wall behind the bedroom door, just looks NORMAL.   (Normal is probably the best compliment I can think of, when dealing with such major changes to this old house of ours.)


Next up ... Day Two.
 
******************************
The work on this project is being done by:
Peter Csemez
Homebrite Renovations
540-295-1337
(If you are in northern/central Virginia and you need a contractor, this one comes highly recommended ... by us!) 
 

Sunday, December 30, 2012

New Project for the New Year

By the end of next week, if everything goes according to plan, The Husband and I will each have our very own walk-in closet!  This is a project that I have been ruminating on for a long time.  (I mentioned it earlier in the year in THIS post about trying to find a place to store my shoes.)

For the past 5+ years, our hanging clothes have shared a long closet with 30-inch bypass doors and inaccessible dead spaces at each end.  I installed two rods in there, one high and one low, but it still was a barely-functional situation.  The smaller door on the left is a narrow closet with The Husband's jeans, tshirts, etc., folded on shelves.


I have been working with Peter, a contractor friend of ours, on the remodeling of our rental properties.  He and I communicate beautifully, and he always does a super job with anything we have asked him to do.  Yesterday, he emailed to say that he has a light week coming up ... and that he will be available to do my closet project!  (cue the happy dance)
 
The dotted lines are the current walls and door spaces.  The shaded lines are where the new closet walls will be.
 
 
The plan is to demolish the wall that forms the front of the current closets.  Peter will build a new wall that continues the line of the wall behind the bedroom door, then bisect the new space with a partition wall to form two closets.
 
The new wall will fall approximately along the line of the rug fringe.
 
 
The part of the project that has eluded me has been the design of the new wall with the closet doors.  My original idea was to reuse the sliding doors (which are solid wood and well built), making them into hinged doors, and center the doors in the new wall.  This bothered me because it seemed like too modern of a design in this old house of ours.
 
As I was up there folding laundry last week, I was staring at the wall and I realized that a solution to my design dilemma is SO simple.  The new closet wall can be built to look like a whole wall of built-in cupboards.  By reusing all three of the doors that are there now, and adding one more door and some molding that we will 'borrow' from another bedroom, we have the materials on hand to make the new wall look like it has been here all along. 
 
This is a quick Photoshop facsimile of what we plan to do.  The center 30-inch doors will open into each new closet.  The 24-inch doors on each side will be fixed, but they will look like they're operable. 
 
You have to imagine that the doors are painted a nice, clean white, and accessorized with antique glass doorknobs.
 
 
Peter and his crew will be here bright and early on Wednesday morning to get started.  In the meantime, I have to empty the closets, heaping our clothes wherever there's room for them, and move furniture to make way for the construction.
 
This is a small job for Peter, but it will be a HUGE improvement to how we function in this old house.  (It should only take two or three days.)  Stay tuned, because you know I will be in there taking photos of the whole process so I can share it with you as it's happening.
 
******************************
The work on this project is being done by:
Peter Csemez
Homebrite Renovations
540-295-1337
(If you are in northern/central Virginia and you need a contractor, this one comes highly recommended ... by us!)  
 
Related Posts with Thumbnails