Saturday, July 20, 2013

An Addition to the Greenhouse

The north side of my greenhouse is almost always shady.  A combination of the path of the sun and the fact that the greenhouse is nestled underneath a large cedar tree on that side makes it a great place to pot plants, etc.  The only downside to this spot is the cedar tree ... it drops needles and berries onto everything below ... potting table, potted plants, stacks of pots, and humans. 

While standing on the deck one day recently, I came up with a solution to my problem.  I could build a roof over this spot!  I scribbled and schemed and measured, and took inventory of my stash of salvaged treasures, and I came up with this:


Let's start at the beginning, and I will show you how it all came together.  (Click HERE if you want to go to a post that shows you how the greenhouse itself was built.)

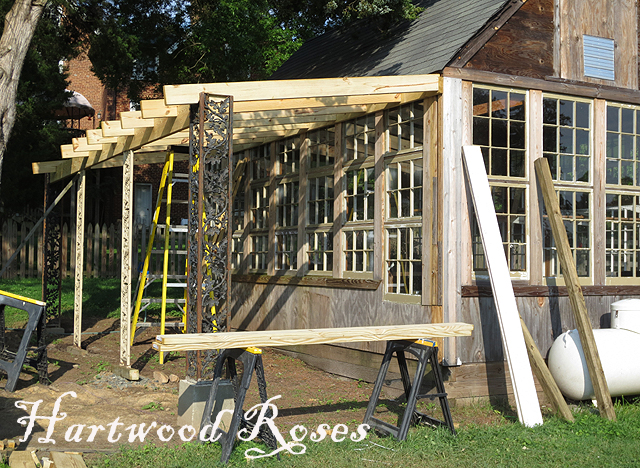
This is what the spot behind the greenhouse looked like right before we started construction.  (It's a mess, I know.)


Son-in-law and I moved all the junk, he cut down the weeds and raked, I stacked empty pots and relocated a cute little Black Rat Snake, and soon the spot was ready for us to get started.


Part of the planning for this was to make best use of materials, with as little waste as possible.  The roofing I chose comes in sheets that are 8-feet long, so we had to carefully calculate where to place the support columns.

The shop vac was there because we used it to suck the thunderstorm water out of the holes.
 
 
This is the Lowes shelf tag on the polycarbonate roof panels that we used for this project.


Speaking of columns, I gave you a peek at one of them in yesterday's post.


I have had these for a while, holding on to them, waiting for a project to come along to use them.  (I love acorns and oak leaves!  It's a huge coincidence that these columns match the greenhouse's iron storm door almost exactly.)

(old photo to show you the door)


It took some fiddling to get the columns plumb and in the right spots, so the roof beam would be level and square to the building.  The ground in this location slopes about 15 inches, so the column on the far corner has a raised concrete base.  (That's the concrete form that you see right now.)


To support the main beam along the 20-foot run from corner post to corner post, I had another pair of salvaged cast iron columns on hand ... these columns have ROSES on them!


Once the columns and the main beam were in place, progress really got rolling and things happened fast.  (This is what it looked like when we left on our vacation, with about half of the roof rafters in place.)


When we got home, I took my morning coffee and went outside and looked down from the deck and saw that my new covered greenhouse porch was completely finished!


The smoked polycarbonate roof barely impacts the light that comes into the greenhouse itself, and it should keep whatever is under it protected from rain and the fallout from the cedar tree.

I see that roof has already caught a few cedar needles.


Now I have a protected spot to work and to store things ... twenty feet long and seven feet wide.


Once we are past this current wave of heat and high humidity, I hope to get out there to organize all the crap and to build in a potting bench.  I also have to stabilize the water hydrant, and decide what to do about flooring this space.  For now, though, I plan to just stare at it and appreciate our Son-in-law's fine workmanship.  He did a great job interpreting my scribbles, working with salvaged materials in an unconventional way, and bringing my design to life!

30 comments:

  1. I am BEYOND jealous! It is gorgeous- just gorgeous! xo Diana

    ReplyDelete
  2. I'm coveting that beauty from afar ~ great job by s-i-l, and looks totally FANTASTIC! Fantastic & functional ... doesn't get much better than that ;>]

    ReplyDelete
  3. Gosh that looks nice! You really have a great eye for envisioning the way you want things to look and your son-in-law is an awesome fella! Love this great use of the space you had available. Really nice!

    ReplyDelete
  4. The unconventional self-constructed things are mostly our best things. I liked your greenhouse already very much but this porch with the cast-rion columns looks really great!

    ReplyDelete
  5. Oak leaves, acorns and ROSES, Connie, it is gorgeous. Oh my, your greenhouse seems more anchored now. Your son-in-law did awesome work with recycled materials.

    ReplyDelete
  6. It's fantastic! I know you'll put it to good use.

    ReplyDelete
  7. Hmmm, it looks like the perfect place for someone to sell refreshments from for barn sales...hint, hint! :)

    xo Kat

    ReplyDelete
  8. We call that a lean-to in our part of the country -- love it! xo

    ReplyDelete
  9. Love the addition! It looks great and will be such a great place to work! Love how your salvaged pieces get used in such a beautiful way!

    Linda

    ReplyDelete
  10. Looks great Connie....what a handy guy to have around!

    I have an idea for you....you should start giving power tool/beginners building workshops! I would gladly pay for that!!!

    Janet xox
    The Empty Nest

    PS....I'm serious!

    ReplyDelete
  11. I love, love, love your addition. It fits perfectly.

    ReplyDelete
  12. LOVE IT...totally jealous....it is beautiful...

    ReplyDelete
  13. My greenhouse was all vesqueened. It lasted through fall, winter and spring but now it's tarped and in shambles. Will have to fix it soon...your greenhouse looks lovely all on its own.

    ReplyDelete
  14. Janie, sweetie, I feel your pain with your greenhouse. Sounds like you used regular plastic sheeting to cover yours, which isn't UV resistant and deteriorates and shatters within a year. You have to use special greenhouse plastic ... that's what I had on mine for the first few years, before I installed the windows. There are still some small, weird spots on the east wall of my GH that have plastic, till I can find or build windows to go in there.

    (Here is an unsolicited suggestion for you: disconnect your Google+ and enable email and it will be a whole lot easier for you to engage in conversations with other bloggers ... this goes for everyone else who come up as a 'no reply' when we get your comments via our email. If you don't know how to do this, here's a link with instructions: http://www.venustrappedinmars.com/2013/06/google-ultimate-no-reply-blogger.html

    You're welcome. :)

    ReplyDelete
  15. Connie, I forget if you said it before; where did you come by the columns?

    ReplyDelete
  16. I LOVE it!!! The acorn columns are what support my front porch! I have to come and visit you!

    Hugs!

    Mikey @ Shabby French Cottage

    me@mikeyfuller.com

    ReplyDelete
  17. Connie - this is just wonderful!!!! I, too, am jealous!! It turned out just beautifully! I can see you spending hours out there protected from sun and rain and providing shelter. :)

    xoxo laurie

    ReplyDelete
  18. I think your new shaded/protected shelter is absolutely lovely. And such a great use of space for you to work outside. Great job!!

    ReplyDelete
  19. Hi Connie, I love how you were able to use the wrought iron pieces into your design. Great job!

    ReplyDelete
  20. So wonderful Connie! I see you came up with an idea on how to use your iron porch panels!! Lovely addition.
    xxojoan

    ReplyDelete
  21. Your greenhouse runs CIRcles around mine, and I am sO envious! If only mine didn't HAve to be modular--sigh.
    btw~I used a sUper grade of that poly for my green house too. The folks at Lowe's gave me the info directly to the manufacturer because they didn't carry it. I LUV LOWE's!
    Catherine

    ReplyDelete
  22. How cool! What a wonderful surprise that must have been to find it all finished! I live how you've used so many salvaged pieces. It is gong to be a delightful potting area for sure.

    ReplyDelete
  23. Awesomeness! The greenhouse gets better and better. I like the addition. I've been thinking and planning mine...wonder when it will happen... :) donna

    ReplyDelete
  24. This is fabulous Connie! Now you need a sweet reading chair under there. How about paving stones with moss in between them for the flooring? Does your son-in-law hire out? :) Question? Can I plant the forever blooming rose bushes in the Fall? xo

    ReplyDelete
  25. Beautiful, interesting, creative ... need I go on ! What a lovely space to enjoy, and no on else will have one which is the same !!

    ReplyDelete
  26. Looks like all you need now are a pair of Adirondack chairs and cooler.

    ReplyDelete
  27. Great job! And I thought your GH was over the top before the potting shed. And Now? Just awesome. Nice to have family that can see our visions. hilltopgypsy88@gmail.com

    ReplyDelete
  28. What stunning photos! You have a beautiful house and garden. Good luck with the "clean-up". I will be back to visit again.

    ReplyDelete

Thanks for stopping by and reading what I share. Comments are welcome and very much appreciated. Spam and trolls are not!

Related Posts with Thumbnails