

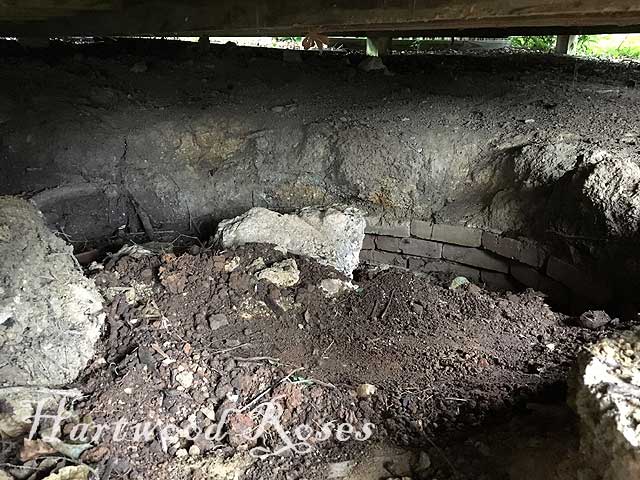
The stone part of the well is from the 1960s renovation of our house. The brick-lined hand-dug well underneath this is original.
The upper stone part of the well is at this cock-eyed angle because former owners of our property allowed a groundhog to burrow and live underneath it. Over time, the ground shifted because of the voids of the tunnels and den spaces, and this was the result. We filled the burrow to the best of our ability, and the well is mostly stable now, but it will never be right again.
Because of the potential for destruction of structures, I do not allow groundhogs to set up housekeeping on our property. When I see one, I catch it with my trusty live-capture trap (baited with apple), then I give the trap to my neighbor and I don't ask questions.

Representative groundhog photo.
Every year, an enterprising groundhog tries to live under our pavilion. I trap the groundhogs when I see them, and do what I can to refill in the hole. Because of its awkward location, complete abatement has been difficult. (The pavilion is only about one to two feet off the ground, on its sloping site. Not enough space to get underneath to work, and can't completely reach the groundhog hole to fill it.) It's not long before another groundhog comes along, does the necessary renovations, and moves on in.

Ruby keeps watch. See the groundhog?
Last week, my husband and I began a project to (hopefully) get rid the pavilion of the groundhog excavations forever. It's a multi-stage plan, all of which was difficult and dirty work.
Step One: Trap current groundhog. Done.
Step Two: Fill in the groundhog crater. This particular spot under the pavilion is where there was once a brick-lined septic tank. It was filled by prior owners, and topped by this handy make-shift cover. We filled again when we built the pavilion, and put the cover back into place.

Photo of the septic tank from 2008, during pavilion construction.

This was covering the septic tank hole when we moved here.

See how the groundhogs dug underneath the sign and into the septic tank space?
Here is a 'before' photo from my files, showing what the pavilion looks like with its steps. The groundhog hole is to the left of the steps, about three feet in.

2011
I had hoped that we could remove some of the pavilion floor to access this spot. This proved to be pretty impossible because the deck boards are screwed down, and at least half of the screws are rounded out and won't budge. Next idea was to remove part of the steps. Not great access, but it's more than we had before.

We shoveled wheelbarrow after wheelbarrow load of fill dirt, by hand, into the hole.
Progress photo.
When the hole was filled, we scattered broken concrete chunks over the area, pushing them into place with a rake. Keep in mind, all of this is being done while we are laying on our bellies in the dirt. Definitely not glamorous work.

Step Three: Keep the groundhogs out of this space forever!
The part of the plan was to lay welded wire fencing over the entire 12 x 24-foot area underneath the pavilion. A quick trip to a local fencing company yielded a big roll of used 4-foot fence that was perfect for the job. We cut three 24-foot lengths and attached them together to make one piece that was the right size.

It took forever to pull the fencing under the pavilion. We used rope attached to the corners of the fencing, and a lot of fiddling and cursing, to tug and fiddle to and get it laid into place. Then, we did our best to weight the wire down with larger chunks of broken concrete.

The edges of the wire are held down with concrete blocks.

Step Four: (Day Two) More wire and a new lattice skirt.
Since groundhogs tend to start their excavations beside structures, then tunnel underneath, we added some extra protection by covering the ground around the pavilion with more wire.

The lattice we chose to cover all of this is pressure-treated "Severe Weather Privacy Lattice" with 3/4" openings. I am very thankful for my pneumatic stapler, which made short work of securing the lattice to the pavilion.

South side, finished!
Here is the Before and After of the right half of the west side.


Here is the entire west side, all finished:

The east side was difficult, because it's really low and I had to carefully maneuver around the plantings there. Hostas, Hydrangeas, Hellebores, etc., are thickly planted on that side. It was like working in a jungle.

Only about 18" of clear space to work in between the Hydrangeas and the pavilion.
Day Two ended with three of the four sides of the pavilion all buttoned up with wire and lattice. The north side, the most difficult one because it's (a) incredibly low to the ground and (b) more heavily planted than the east side, is all that we still have left to do. I plan to do this early next week. (Too much to do till then to even think of it now.)

View of the pavilion from the deck, as I grilled salmon for supper at the end of Day Two. Look carefully and you can see the shiny new lattice skirt on the east side.
I liked the original lattice with larger openings, installed behind the posts, a lot more than the new lattice. Perhaps it's bothering me because the new lattice is so new and sparkly. Once it weathers a bit, I know I'll like it better. I have to keep remembering that this new lattice is a contributing feature to the groundhog deterrent system ... that's the most important thing.


