Showing posts with label Old House Reality. Show all posts

Thursday, June 2, 2016

Come Into Our Living Room

When we made plans for the Stafford County Historical Society to come here to tour the house and garden last month, I knew that we had a lot of work to do to prepare.  I called it "spring cleaning under duress".  When the weather was favorable, I worked outside in the garden.  When it was rainy, I cleaned and staged the main level of our house.  

I have to share what we did with our living room, because it turned out so well.  This is the room that tried to bring our whole-house renovation to a halt ten years ago, because the challenges in there were above and beyond what my energy and our budget could handle at the time.  My husband and I made the conscious choice to leave the room in its demolished state and to concentrate our efforts on the rest of the house.  For a while, we used the room as a storage area and we could barely squeeze through there.  Last year, we cleared out the extra stuff (found storage space for what we needed, donated/trashed the rest) and set things up so we could actually live in the space.  For the home tour, we went a bit farther and I LOVE the result.


Last time you saw this view of the living room, it looked like this ... functional, but stark.


The first new thing that we notice is the stack of trunks.  These used to be stored in the attic of our garage, because I hadn't figured out a place to put them.  (I tell people that I need a 12-step program for my trunk addiction.  I have a LOT of them.)

Imagine the conversation as I asked my husband, "Would it be weird to stack trunks on this wall?"

"I don't think so", he replied.

"The stack is gonna be seven feet tall"

"Oh."


(In case you're wondering, all of the trunks are empty right now.  I'm hoping to resist the urge to store things that I probably don't need and keep them empty)


On the other wall, I moved the jelly cupboard from the office and hung a painting above it.


The painting is a portrait of me, painted last year by a dear friend of ours.  It's HUGE, it fits perfectly, like it was made for this spot and I love it.


I cozied up the fireplace wall by leaning a vintage painting above the mantle (which still isn't attached to the wall), and filling the fireplace with electric candles.


At this point in the photo shoot, Alice came in to see if there was anything that I needed her to do.  "Just sit there and look adorable, Alice."  The trunk that she's sitting on is an antique six-board chest, with its original paint, that I picked up cheap at an estate sale.  What can I say ... I have trouble resisting a good trunk.


Modern stuff is tucked onto the other wall, where it's behind you and not visible as you enter the room.  TV is something that we really enjoy, but I don't like for it to be the first thing that I see in a room.  The sound bar sits on a shelf above the TV, with one of my husband's paintings above it.


With an eclectic mix of worn Oriental rugs, quilts, and antique furniture in its primitive state, this room showed very well on tour day ... and it's really comfortable to live in.

Monday, February 8, 2016

All I Wanted to Do Was Put Up Some Shelves ...

Old house people will be familiar with the theme of this story ... it's rare for a project in an old house to progress on schedule or as planned.  

Around here, dealing with stashes of materials for various projects is a real problem.  For example, I have siding from the Shack stacked on the floor of my workshop, parts of the trim for our stairs piled in a corner, and baseboard and casing molding from our living room leaned into a corner in the garage.

A few weeks ago, I saw THIS post over at Follow Your Heart Woodworking.  Julie built a genius lumber rack for her workshop.  I planned to use this idea to get my own materials off the floor and organized on narrow shelves on the wall of our basement hallway.  All I had to do was locate the wall's framing, screw a piece of slat-board to the wall (like I did in the garage in THIS post from 2009), slip in a few shelf brackets (which I have on hand), sort my materials onto the new shelves, then stand back and admire the results.  You have probably already guessed that this is NOT what happened.

The basement wall in question has two layers of drywall on it, which are attached to furring strips applied over a coating of gypsum plaster, which was applied over the original lime-washed brick ... I know this because of other basement walls that we have worked on.  Drywall Layer #2, the outer-most layer, was only secured with glue and a few screws.  I figured that I should remove it to have better access and a more secure attachment to the furring strips that were behind Drywall Layer #1.  As I was pulling off chunks of Layer #2, I realized that Layer #1 was poorly secured, too.  Dang it!!

This is as close as I can get to a Before photo.  The green that you see is the lower-most layer of drywall.  The upper-most layer is somewhere under that pile of stuff on the floor.


Turns out that there was very little left of the furring strips that were intended to secure Layer #1 to the wall, and the gypsum plaster at the bottom of the wall behind all of this had completely separated from the underlying brick.

Bottom portion of one of the furring strips.


Two more furring strips, totally decayed.  The black that you see is creosote, which was supposed to help the wood resist moisture.


Gypsum plaster is good for a lot of things, but applying it in damp environments is a total no-no.  Lime plaster would have been a better choice.  (This old house of ours is made entirely of soft brick, which is known to soak up water like a sponge.  This causes a condition called "rising damp".  Any water around or underneath the house is absorbed, transferred up the walls by capillary action, then dissipates as vapor.)  The former owners of our house who finished the basement early in the 20th century and used the gypsum plaster on the walls were probably not aware that they should be concerned with this.  (For the record, we have never had any standing water in this basement, neither did the family that owned the place before us.  I don't know about the experience of any other owners.)

See how the gypsum plaster has totally separated from the brick.


The gypsum plaster slumped and cracked, and fell away.


As the water vapor exits the bricks, it carries minerals from the plaster and mortar with it, leaving behind crystals called efflorescence.


How about some really scary electrical stuff?  (Not to worry, we recognized this a long time ago and disconnected it.)

Look at the rust on that electrical box!


The next photo shows drywall layers and furring strips are down ... next step was removing the loose gypsum plaster, with a hammer and 5-in-1 tool ... then the big job of cleaning up my mess (which I did not photograph).


About three hours after the project started, I was left with this ... a mostly-bare brick wall, and no shelves.


We like the look of the original brick, and leaving it exposed to allow for unrestricted flow of vapor is healthier for the house.  The other side of the basement hallway and most of our game room is already like this.  Eventually, we plan to remove the rest of the drywall and plaster, to expose the brick throughout the entire basement and return it to more of its original appearance.

Game room wall.


Game room wall.


Basement stairs.


After all of this effort, I scrapped the idea of making this into a materials storage wall.  The plan was going to be a temporary solution anyway, so now I will brainstorm and come up with another idea to organize my materials and supplies.  

What's the Take Away lesson in this story?  Covering up a problem (with multiple cover-ups, in this case) won't make it go away.

*************************
Postscript ... When I went upstairs after I finished all the banging and hammering, this was the scene in the family room.


It's good to know that Ruby and Winnie weren't bothered by all the noise.

Friday, January 8, 2016

Deconstructing the Living Room Ceiling

My husband wanted a project to work on (and hopefully finish) while he was off work for two weeks over Christmas.  He decided that this would be the perfect time for him to deconstruct our living room ceiling.

We decided a long time ago that it would be better to remove the ceiling in our living room, instead of trying to repair it.  It had extensive water damage, and large portions of the plaster had separated from the lath.  When our plasterer remedied a similar situation in our guest bedroom, he used screws and plaster washers to resecure the detached plaster, then he taped and skimmed over his repair and made it disappear.  The living room ceiling had an additional complication which made it less of a candidate for the plaster washer repair.  Over the years, debris had collected in the space between the large sections of loose plaster and the lath where it was formerly attached, which prevented us from reestablishing a good connection using the screws.  


It took a long time for me to get comfortable with this.  Throughout our renovation of this house, I have done whatever I can to preserve original elements.  I respect the history here, and I want to keep as much of it as possible.  In order to move forward with the work in the living room, I had to grit my teeth and admit that this ceiling, though largely original, had to go.

First, we had to remove everything from the room ... and we stashed stuff wherever we could throughout the house. 

Rug, console, and a pile of trunks in our foyer.


Sofa, Maggie's favorite wing chair, and disassembled recliner in the dining room.


Once the room was empty, we laid paper to protect the floor.


This paper was previously used during ceiling repairs upstairs ... reuse and recycle!


Plaster removal itself was done carefully ... using a 5-in-one tool and a hammer to chip off manageable pieces, which were dropped into buckets.  I'm no fan of sledgehammer demolition, because it creates a huge mess, causes unnecessary destruction, and would most certainly damage the floor as the heavy debris falls.


See the bit of brown horsehair in the one chunk of plaster?

Slow, steady progress.  


The strip of something that you see on the wall below the ceiling is a wallpaper border that had been hidden behind crown molding.  The crown molding also hid a strip of wallpaper on the ceiling.  The wallpaper is not an 1840s original, but it does look old.  This room has been updated a number of times, most notably in the 1930s, and the wallpaper may have been installed during that remodel.

The ceiling paper has a slight sheen.


From a distance, it looks vaguely like an all-over floral ...


... though I can't make out a true pattern to it.


Plaster removal took 2-1/2 days.  Plaster is heavy, and working overhead like this is very tiring.


There was an insane amount of sand and brick dust in the ceiling above the fireplace.


Plaster ... all gone.


Originally, we planned to leave the lath in place and drywall over it.  With the plaster gone, we could see that the lath wasn't even enough for us to do this ... and there was a LOT of stuff in some of the joist spaces above it.  Just like with the plaster, the lath had to come down ... carefully.


It was really exciting to reveal the original ceiling joists.  The ones that appear to be short are extensions of the the joists of the adjacent foyer.


Once the lath was down, we sifted through the debris on the floor as we swept it up, to make sure that there weren't any hidden treasures.  What did we find?

A vintage rat nest ...


... which contained lots of fabric scraps ... none of which was modern, thank goodness.


Two rat mummies.


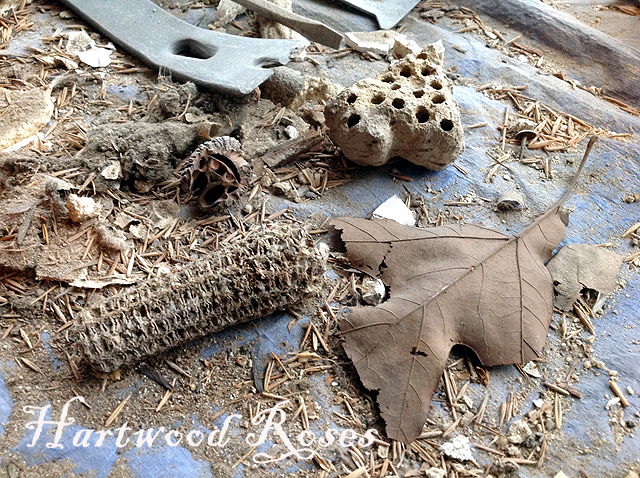
Walnuts, a corn cob, mud dauber nests, and some leaves from the Post Oak tree beside the house.


Pieces of glass, some newspaper shards, and a few old nails.


Three of the pieces of glass fit together, and they appear to be part of a pressed glass footed compote.


We pulled the nails out of each piece of lath, sorted them by size, and bundled them for easier storage.  I hope to give it to someone who has a need for 19th century sawn lath.


I am always in awe of the craftsmanship of the framework of this house!

There are cross beams beside the chimney, which support fireplaces on the upper floor.


The cross beams are connected to the floor joists with pegged mortise-and-tenon joints.


With the plaster and lath removed, and the mess cleaned up, this part of the living room renovation is finished. 


It will be a while till we work in this room anymore.  We have to rerun the wires for the recessed lights, add new wire and a switch for a chandelier, decide what to do with the bookcase space, etc., etc., etc.  In true old-house tunnel-vision fashion, we put the furniture back into the room and we will use it as is ... till we get the energy, motivation, and inspiration to keep working to make it beautiful again.

Related Posts with Thumbnails