Saturday, December 14, 2013

Meeting Myself Coming and Going

This weekend is going to be a wild one, with multiple commitments on both days and very little time to spend at home.  Fortunately, every single thing that we have to do is something fun!

Saturday afternoon, The Husband and I will be hosting at one of the houses in downtown Fredericksburg on the Christmas Candlelight Tour.  Historic Fredericksburg Foundation goes all out every year, and the homes are always beautifully decorated.

photo from the house we worked on 2012 Christmas Tour.


Because we are working the tour in the afternoon, we are taking the tour in the morning so we can see the other houses. 

photo from the house we worked on 2011 Christmas Tour.


Saturday evening, we plan to go out for dinner somewhere to take advantage of the fact that we will both be nicely dressed and looking very Christmas-y, then we will spend the evening at our daughter's house to babysit the grandkids.  Now that I think of it, I should take a change of clothes with me so I can get on the floor and play.


Sunday morning, bright and early, I will meet a hauler to pick up three greyhounds who are on their way from Florida to an adoption group in Maryland.  Transporting dogs like this has always been one of my favorite parts of working with greyhound adoption!

photo from a greyhound haul in 2012.


As soon as I drop off the dogs, we have to turn right around to make it to a meeting for Greyhounds Rock Fredericksburg, our charity that raises money for canine cancer research.  GRF meetings are always full of food and fun.  Our benefit in November was a great success ... this is the meeting where we figure out how much money we can donate to this year's beneficiary, The Mosby Foundation, and we start to plan what we will do in 2014.

Sweet Daniel, who died of lymphoma in May ... he didn't mind wearing those bunny ears.  He was such a good boy!


Sunday afternoon will be full of even MORE friends and fun!  I will be with the crew at The Empty Nest for crafts and girl time (and more food).

Whew!  I'm already tired from writing about this ... can't imagine how it will be after I actually LIVE it.  That's part of what Christmas is around here, though.  It's a season full of time with family and friends, doing good for others, enjoying decorations and great company.  I wouldn't have it any other way.

Friday, December 13, 2013

Use Glaze to Add Depth to a Chalk Paint Finish

When we last left the story of the chalk paint makeover of my set of 1970s oak tables, their tops were stripped and stained, and their bases had been painted and wet distressed.  (Post about stripping the tops is HERE, and the lesson on wet distressing is HERE.)  Now it's time to use glaze to add dimension to the color and give the painted finish that little extra 'something'.


There are plenty of tutorials out there that show you how to use dark wax to do this ... I published one myself because that's what I used to do, and it's my most popular post to date (HERE).  One day, though,  I had a revelation ... dark wax sits on top of the finish and it isn't permanent.  That's okay for some folks, but I work hard to get my painted furniture pieces looking just the way I think they should look, and I want them to stay that way.  I do this by using glaze instead of dark wax.  Here's what I use and how I do it:

There are no special supplies needed.  Squirt some brown acrylic craft paint into a disposable cup.  Add water and stir until the mix is a consistency somewhere between cream and milk.  Grab your paintbrush (I use a disposable chip brush) and a couple of paper towels, and let's get started.


Here's what the table leg looked like before any glaze was applied.

Painted table leg, wet distressed, ready for glaze.


The idea is to brush the glaze mixture onto the paint, and to work it into the turnings and crevices with your brush.  Go easy with this ... you don't want it to drip all over the place.  I apply only enough glaze to wet the surface and I scrub it in good with my brush.

I work in circles or across the grain to get the glaze into every crevice.


The glaze gets all foamy when I scrub it in with my brush.


Then I blot my brush on a paper towel ...


... and smooth the glaze until it's just a haze on the surface of the paint.  If you need to, you can use a paper towel to carefully blot any place where you have too much glaze. 

All smooth now.  Final strokes in the direction of the grain, and around the turnings.


The glaze creeps into the nooks and crannys, and it adds even more to the appearance of age and wear on this table. 

Here, you can clearly see all three colors of paint (Graphite, Olive, and Aubusson), plus some raw wood.


I usually put on two coats of glaze, just to make sure that I haven't missed any spots and to even out any blotchy spots that may have happened during the initial coat of glaze.  See the places in the turnings of this leg that got missed while I was working on the first coat with the table upside down?  When the first coat of glaze is dry, I flip the table and apply the second coat with the table right-side up to catch all of these places.

Blotchy, with spots that I missed with the first coat.  I'll fix it!


For these tables, I was aiming for a streaky, smoky look to the final finish ... not as much as those awful old-school antiquing paint kits that many of us remember from the 60s and 70s, though. 

Wet glaze.


Once the glaze was completely dry, I applied two VERY light coats of Minwax Satin Wipe-On Oil-based Polyurethane.  If done with a light hand, and carefully buffed with a sanding pad between coats, I almost dare anyone to tell the difference between this and a clear wax finish.  (If you want, you can use clear wax after the glaze instead of polyurethane ... for myself, I prefer the durability and permanent nature of varnish.)

As soon as I get some decent photos of the tables in place, which means spending the rest of today completing the reclamation of our living room, I will be thrilled to show you the final result.

sharing at Miss Mustard Seed


Tuesday, December 10, 2013

How To Wet-Distress a Chalk Paint Finish

Many of you have asked for a step-by-step lesson to show how I get the subtle distressed finish on some of my furniture projects.  The subject of today's lesson is an oak end table, part of the set that matches the coffee table that I showed you in THIS POST last week. 

When I distress a piece of furniture, I try to simulate the effects that time and use (and a bit of abuse) would have had on it.  There are no random sanded spots here and there ... every worn place is well thought out, as if that part of the piece has been bumped by brooms and mops and vacuum cleaners and toy trucks, scraped across the floor, and wiped down and polished for decades.  The idea is to wear down the top layer of paint to reveal the perceived history of the piece underneath.

Here is the After ... settle in, and I will show you how it got this way.


As we start the lesson, the subject table already has coats of three colors of Annie Sloan Chalk Paint:  coat #1 is Graphite, coat #2 is Olive, and coat #3 is Aubusson.  (I didn't photograph the painting part of the job ... I'm going to assume that you already know how to do this, so let's skip ahead.)


The supplies for wet distressing are probably underneath your kitchen sink right now ... a ScotchBrite scouring pad and a small bucket for water.


The process is simple ... use the wet scouring pad to gently scrub the corners and edges and the high parts of the turnings, edges, and corners to reveal the color underneath.  Scrub with the coarse part of the pad, wipe the area clean and refine the distressing with the sponge side.  Rinse your pad often as you work.  Go easy so you don't scrub completely through the paint at this point.  You can work across the grain, with the grain, or scrub in circles ... experiment to see what gives you the look that you want.


I love how the careful distressing brings out the details of the wood grain and accents the table's contours.  The top coat of Aubusson stays in the recesses, and the colors underneath are revealed in the high spots and wear areas.


I wanted this table to be even MORE worn looking, so I used the scouring pad and my fingernail to scratch the paint off down to the bare wood in select spots.  I only did this in places that could really have received this sort of abuse ... more on the lower portions of the table legs, where brooms and boots would have made contact, and none on the upper parts.


The side of the table looks like this when the distressing is finished.


As I look at the results on this table, I realize that the Graphite layer doesn't show up very well and probably wasn't necessary.  If I do this color combination again, I will just use Olive and Aubusson and skip the Graphite.

The table now ready for me to add even MORE detail and personality with glaze ... which will be our next lesson.  Stay tuned.

Saturday, December 7, 2013

Sofa Slipcover Progress

With the pattern I made from the first cushion in hand, it was a fairly straight-forward process to assemble the cover for my living room sofa's second seat cushion.


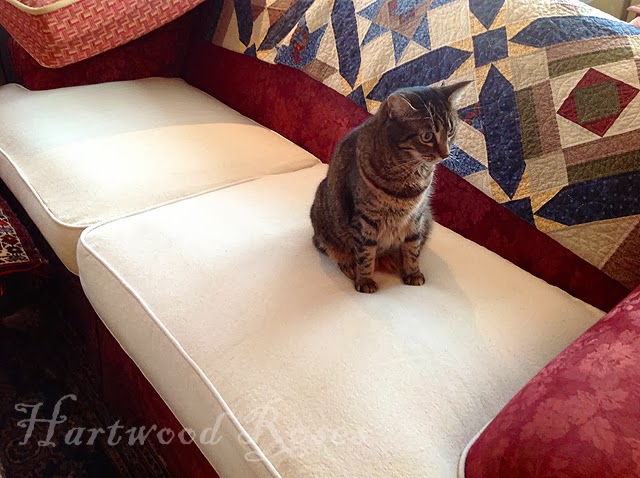
Dorothy approves.

Next step, fitting and figuring out how to do the arms of this thing.  I hope to work on this on Sunday, while the temperature outside is frigid and some predicted frozen precipitation is falling from the sky .. that is, if the storm doesn't knock out our power.  (I am hoping that the Weather Gods keep the ice accumulation to a minimum for us ... or skip it all together.)

Stay warm, Everyone!

Thursday, December 5, 2013

A Glimpse of Thursday, from Alice's Perspective.

It's Ladybug Season.  The outside Ladybugs are doing what they can to become inside Ladybugs, so they can hibernate the winter away in comfort.  This old house has ample cracks and tiny spaces that allow them entry.  When they come in, Alice takes it upon herself to monitor their activity.


Thank goodness we don't get the scourge of Ladybugs that I have heard that some people have in their houses in winter.  We only get a few ... enough to keep Alice occupied and out of trouble, but not so much as to be a problem.

Wednesday, December 4, 2013

My Best Tool for Stripping Table Tops

Slipcovering the sofa is only one part in my reclamation plan for our living room ... another one is painting and refinishing a set of tables that I got from my sister-in-law.  Yesterday's warm temperature was perfect for doing the messy, best-done-outdoors part of the project, stripping the tops. 

Exhibit A:  one 1970s coffee table, solid wood, heavy as all get-out, and definitely ready for a makeover.


The finish is in pretty awful shape, which makes it even easier to strip off.  I read about all sorts of methods of doing this on blogs ... most of which are messy, time-consuming, and produce less-than-stellar results.  Believe me when I tell you that there is a MUCH better way. 


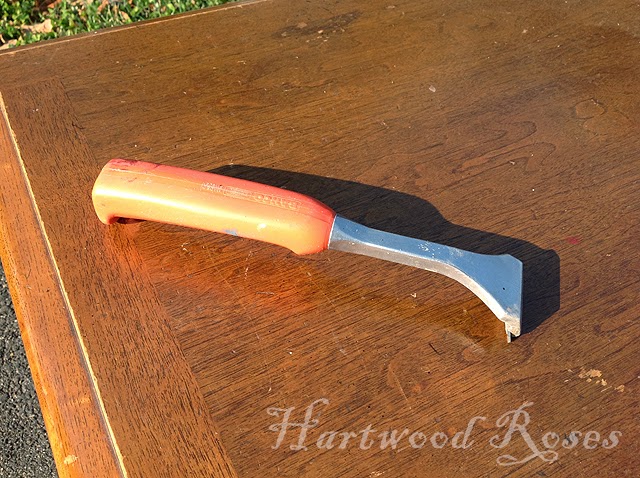
For a table top like this, I pull out my trusty Bahco carbide pull scraper with a 2-inch blade.  I have tried other brands, and this one is my favorite.  The blades for this thing are sort of expensive ($10 or so apiece), but they are sharp as a kitchen knife and they last for a long, long time.  This tool makes the job go easier and faster ... think about it in terms of how much your time worth ... if it takes less time and produces better results, I'm all for it.


The idea is to scrape off as much of the lacquer as possible, using a pulling motion with the scraper.  If you simply try to sand the stuff off with an orbital sander, the lacquer melts and makes hard globs on your sanding disk ... and you get those little spiral marks on the wood.  It requires some practice and finesse to get the hang of scraping, but it's also a great way to work on those problem areas that some of us have on our upper arms ... just sayin'.

Let's start the clock and see how fast this project goes:

10:25 am -- just getting started.


11:15am -- all the finish is scraped off.


11:30am -- all finished.  Sanded with my orbital sander, 150 and 220 grit sandpaper.


Here is a close-up, all stripped and sanded and ready for stain.


The paint finish I'm planning looks best with a dark top, so I pulled out my trusty can of Rustoleum stain in 'Kona'.  This is what the top looked like after an application of stain pre-conditioner and one coat of stain.


Now that all the messy stuff is finished, I can work on the rest of the job inside in my workshop.  Still to come, varnish on the top and a 4-step paint finish on the base of the table.  Here is a preview, as seen in this grainy, low light iPad photo of one of the end tables that I finished as a test piece.


Here's a little word about my scraper ... I have had this scraper for about a million years.  I bought it at a specialty paint shop in downtown Fredericksburg, which went out of business last year (undoubtedly a victim of the onslaught of big-box stores).  This isn't the kind of thing that you'll find at Lowes or Home Depot.  They have their own brands of carbide scrapers, made in China, of course, and I haven't been as happy with their versions as I am with my little orange-handled Bahco.  (which is made in Sweden) 

My new source for replacement blades is The Paint Shop in Warrenton.  Small business shopping at its finest ... support your local businesses so they can continue to carry the fine-quality items that mainstream retailers don't bother with.  The Paint Shop has other specialty tools, as well as Farrow and Ball paint, and all sorts of other wonderful temptations.  (not a sponsored post ... just ramblings of a very, very satisfied customer.)

I think today is a good day to get started on the paint.  More about this later, I promise.

Tuesday, December 3, 2013

Project Helpers

On Sunday, I decided to start a new project ... one that has been on my mind for a while ... one that seems like a perfect thing to do during the time spent indoors while the weather is cold this winter.  I am planning to slipcover the sofa in our living room.

This sofa is identical to the red one in our family room.  We bought them for our living room at a former house, which was huge and could easily handle the visual weight of two very large red sofas.  Neither the living room or family room in this house can do that, so we have one sofa in each room. 

The cotton damask upholstery on both of them is showing its age ... splitting and shattering in a couple of spots on the now-underside of the cushions and snagged and torn on the corners from Maggie's habit of sharpening her claws on them.  The shape of the sofas is perfect for slipcovering and everything except the fabric is in great condition, which the main reason that I have held onto them for so long.  Another reason is that I cannot in all good conscience spend $$$ on furniture to have it become another victim of Maggie and her claws.  (I know that you are about to suggest ways to train Maggie or to encourage her to scratch elsewhere.  Take my word for it, I've tried it all.  She is now 12 years old, and I accept that there are things about her that I cannot change.  Her scratching is one of them.)

Anyway, back to the slipcover plan ...

Sunday morning, bright and early, I broke out my supplies and got started.  For the rest of the day, while watching football games on TV, I pinned and snipped and sewed.  I had help while I worked.  Ruby used her head to hold down the fabric, while I was pin-fitting the box-edge of the cushion.


Dorothy is always involved in any sort of crafty project.  She gets right into the middle of things ... very serious about her job as Quality Control Supervisor.


At the end of the day, I had finished exactly ONE cushion.  It took a while for me to cut and sew all the cording that I needed, and to figure out the pattern to accurately fit the cushion's odd shape.  I am extremely pleased with how this turned out.  I tried it onto the family room sofa to step back and admire my handiwork, and because the light in there was better for taking a picture of it.

Do you see all the cat scratching on the arm of the sofa?


I am resigned to the fact that finishing the rest of the slipcover is going to be a slow process.  I learned to sew when I was 12, and I have made just about everything you can think of in that time ... except for a slipcover.  I'm learning and figuring this out as I go, which takes a lot longer.  I will work on it whenever I'm stuck inside, and I will be pleased to show the finished result to you when it finally happens.  In the meantime, don't hold your breath.
Related Posts with Thumbnails