
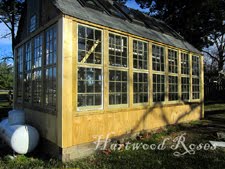
Here is a reminder of what the greenhouse's north wall looked like at the end of the day on Thursday. Fourteen of the twenty-one windows for this side are installed at this point.

The layout of the windows in the greenhouse has been an ever-evolving design. Originally, the windows were designed to go all the way to the floor on three sides, with windows on the upper half of the north wall. The East Coast earthquake earlier this year, and subsequent storms that racked the building frame 1 1/2 inches out of plumb, showed me that my design wasn't stable enough and I had to come up with another plan ... which is what I have now. (It took an afternoon to do it a few weeks ago, but the building is straight again, and braced into position before we installed any of the windows.)

This new window plan, however, left me one window short for the north wall. See the glaring hole in the center of the bottom row?

Saturday's mission was to find a window to fill the hole ... AND to rest and let my over-worked body recover a bit from what I've been doing to it. The Husband and I began our search at the Habitat ReStore in Richmond, where there is always a rich supply of old wood framed windows. On Saturday, there were practically none.
Plan B ... there would certainly be a window we can use at Caravati's. (Caravati's is a totally fantastic architectural salvage place in south Richmond. I have tons of photos of our visit there, which I will show you later this week ... time permitting.)

We needed a 6-pane window, 28 inches wide and either 19 or 20 inches high. The Husband helped me sort through the windows in the 28-inch section, and we found six candidates. I chose this one because the wood frame is solid and isn't at all rotten, the glass is intact, and the glazing putty was falling out and no one had tried to repair it. This one will be a cinch to re-putty and get back into shape.


Once it's painted next spring, you'll never know that it doesn't exactly match the others. (If we had found a window at the ReStore, it would have been $5. The one we bought at Caravatti's was $25. Oh well ... it looks really good!)

The inside of this wall now looks like this ... I don't ever think I'll get tired of this view. The large brackets on the posts are the supports for one of my benches.

Now that the windows on this wall were finished, it was time to start framing the opening below for plywood sheathing. I started by marking the wall at 16-inch intervals for the studs. Each section was built, slipped into place, and toe-nailed to the posts. (I'm still trying to decide how to design the trim to compensate for the stepped design of the windows on this wall, so I'm doing the center of the wall first.)

At this point, I had enough time and daylight left to cut and install two pieces of plywood sheathing.

As the daylight faded, and I stood back to take this photo, I was totally tuckered out ... but very, VERY pleased with the day's progress. The temperature today is supposed to be near 70 degrees, with sunshine and light breezes ... and it will be a perfect day to keep working.
More later, as progress warrants.
(If you are visiting from one of the link parties, and you haven't seen how I got to this stage of the construction, click on the 'Greenhouse Windows' label below to get a list of the earlier posts in this series.)
This post is linked to:


I imagine an architectural salvage place is very cool. Congrats on all the progress you're making. You'll be closed in very soon!
ReplyDeleteOh Connie - that looks lovely!!!! What an amazing job you've done :
ReplyDeleteI'm jealous. Since I am not good with growing green things I would just set a few nice chairs in there, a couple of tables, grab a cup of hot tea and use it as a place to getaway and relax. But that's because I have two brown thumbs, unlike you. :-) Looks wonderful, Connie!
ReplyDeleteIt will be beautiful !I can see a chandy hanging in the middle and spakeling through those windows at night. ( my idea ) lol. I can see all the beautiful plants you will have in there in my imagination already.
ReplyDeleteConnie this really is going to be an amazing green house! You are pretty amazing yourself! hugs, Linda
ReplyDeleteThe greenhouse is looking gorgeous!
ReplyDeleteIt gets better and better...gorgeous!!! And I love the great glass in the "new" window. Lucky you!!! Donna
ReplyDeleteIt is amazing and gorgeous. And, so are you. Wow!!!
ReplyDeleteSo beautiful I can't wait till it's done. I am really green with envy. GORGEOUS! If I had one of those I might just have to live in it.
ReplyDeleteI'm still in awe of your abilities and energy!
ReplyDeleteWowzer Connie!
ReplyDeleteI am just so impressed that you are doing so much of this work yourself. And your building is going to be very handsome!
ReplyDeleteWOW! Just keeps getting better & better. Will you be keeping all those windows clean?
ReplyDeleteConnie, the stepped window side is the side with your potting bench, right? If so, it might be nice to lower the bench to match for putting big pots, tubs of potting soil and oather large things so you don't have to lift them as high as the working level. Watcha think?
ReplyDeleteHello! Gorgeous! We have a few windows I hope to make into a greenhouse - my spot is not that big, but I am so looking forward to it. Diana told me you may be able to help me identify this rose growing in my garden.
ReplyDeletehttp://blissfulrhythm.blogspot.com/2011/11/soft-goodmorning.html
If you could I'd appreciate it!
Thanks,
Kathy
So happy to see my Princess Cottage is almost finished! I will email you my address.
ReplyDeleteYou are having it sent to me, right?
Connie? Hello?
It's gorgeous! Can't wait to see all finished :)
xo, misha
My jaw dropped when I saw these photos. What an amazing greenhouse!
ReplyDelete