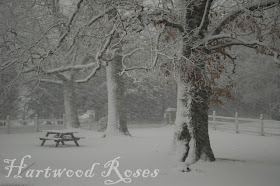
When I loaded the memory card into my laptop to view the photos, I decided that they could use a little bit of tweaking, a lot like I did when I used to develop photos in the darkroom in the Dark Ages of film photography. It was a simple matter to use PhotoShop to darken the trees, increase the contrast, and sharpen up the blowing snow.
Here is what the photo of the three trees looked like straight out of the camera. It's okay, but I knew it could be better.
After we finish with it, it will look like this:
Open the photo in PhotoShop. The first thing I did was adjust the size of the image to 640 x 480, so I was working on the image in its actual size.
To adjust the levels to darken the trees, Click 'Image', 'Adjust', 'Levels'.
And you get a pop-up window that looks like this. Click on the black eyedropper icon, then click somewhere on the photo that you want to tell PhotoShop should be true black. I clicked on the center of the hollow part of the front tree. If you don't get the result you want when you click on the photo the first time, click around until you like what you see. If you totally hate the results, click Cancel and close the window, and your photo will remain unchanged.
My next step was to increase the white range (Don't quote me on this terminology, because I don't know if that's what it's really called.) Again, click to adjust the Levels. This time, I grabbed the white-point slider and I moved it until I liked what I saw.
To make a sharper contrast between the lights and the darks, click 'Image', 'Adjust', 'Brightness/Contrast'. Click and hold the sliders, and drag them where you think the photo looks best. I brightened the photo a bit, and increased the contrast considerably.
If you look at the original photo, you see that I had to deal with the pesky issue of my daughter's car antenna in the lower left corner. This distraction was dispatched fairly quickly with a few strokes of the PhotoShop airbrush. (I can show you how to use airbrushing later, if there's interest.) The "H" on my Hartwood Roses watermark disguised the fact that there was ever an antenna in the picture.
The last step is to sharpen the photo, to accentuate the texture and details, and to focus on the emotion of the blowing snow. Click 'Filter', 'Sharpen', 'Sharpen'.
That's all there is to it!
I use PhotoShop 6.0, which is the oldest version of PhotoShop that will run on my new laptop. There are newer versions out there, but they are considerably different than what I'm used to and I didn't want to have to learn how to use them. I have never used any other photo program besides PhotoShop, but I imagine that the concept of adjusting levels and contrast and sharpening images is similar no matter what program you have.
Class is over. Any questions?


