Pages

Thursday, August 29, 2013

The Front Hybrid Tea Garden

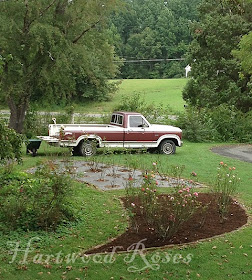
This garden of classic Hybrid Tea and Floribunda roses is in our front yard.  I designed it in the fashion of rose gardens in the late 19th and early 20th centuries, with roses planted close together in beds that are cut into the turf.  Until last week, it looked absolutely horrible ... overgrown, neglected roses, choked with weeds.  Since I'm riding this wave of motivation, this garden was the next one in my sights.

It looked like this while I was creating it in 2008. 


Spring 2009 was glorious.


My energy has been elsewhere for the most part in the years since then, and the weeds moved in.  You don't notice them so much while the roses are blooming ...


... or when a lovely fog moves in.


I don't have graphic, ugly "Before" photos of the weeds as they were before my friend Robert and I got to work on them last Thursday morning.  Trust me, it was a horrible situation.  It took the two of us most of the day, but we succeeded in getting three of the four beds in this garden cleared out.


It is now up to me to finish the job.  I raked the beds and applied Preen, to prevent the latent weed seeds in the soil from germinating.  (I can barely imagine how many seeds must be in this soil.  Crabgrass, Wild Violets, Poke Weed, etc., sprout almost immediately in any bare patches of ground.)  Landscape fabric was the next step.


By the end of the day yesterday, I had one whole bed mulched and completely finished and another bed was covered in landscape fabric and ready for mulch.


My goal for today is to try to get the rest of this load of mulch out of the back of my truck.  There is not enough in there for me to finish the second bed ... that's okay, I will get more mulch this weekend.  (For now, I need an empty truck so I can make a run to Lowes to get some materials to have on hand to can work on the Shack when I get the opportunity.)
 
Fighting the war, one weed at a time.  It feels good to be making progress ... keeps my energy up to continue with the battle.
 

Tuesday, August 27, 2013

Day of Rest

Even though Monday's weather was perfect for yard work, I took the day off from the garden.  Instead, I spent time with Daughter #3 ... shopping and eating and laughing.  I don't shop very often, unless you count junk shopping. 

Our daughter is outfitting a new house, so her sights were on drapes and curtain rods and the like.  Me?  I need some fresh items to perk up my very grey, very predictable wardrobe.  I found a few things that I liked ... including a grey maxi skirt at The Gap, which doesn't do anything to alleviate the overwhelming 'greyness' in my closet.  (What can I say?  I like grey and I look good in it.) 

My favorite buy of the day was this sweater from Forever 21.  As soon as I saw it, I knew that I HAD to have it!


Now I can't wait till it's chilly enough to wear it!  It's perfectly perverse, and absolutely, positively ME!!

Friday, August 23, 2013

Friday Flowers: Changes in the Arcade Garden

Toward the middle of our property, we built a large structure that I call The Arcade (because it has arches).  This serves as a place for climbing roses along the 'path' to the Rose Field and English Garden beyond. 


Like the majority of my gardens now, The Arcade is suffering from lots of weeds and very little mulch.  Storms we had on Sunday made the soil perfect for pulling weeds and, while I was in a holding pattern for the plumbing consultation for The Shack on Wednesday ... I spent Monday and Tuesday getting this little garden back into shape.

I say "little" because it holds only ten roses ... not 'little' at all in reality.  The structure is 54 feet long and 10 feet high.  The bed that holds the roses is 7' wide.

Which roses, you ask? 

1.  'Pink Perpetue'


2.  'Rhode Island Red'


3.  'Sombreuil'


4.  'Isabella Skinner'


5.  'Henry Kelsey'


6.  'Swan Lake'


7.  'Parade'


8.  'Pink Pillar'


9.  'White Cap'


10.  'Compassion'


As I was pulling weeds, I decided that now is the perfect time to make some changes I have been thinking about.  First, though, I had to get the weeds out.


For the first couple of years, I was very happy with my rose choices on The Arcade.  Fast forward to 2013, and I think I'm in the mood for a little change.  Six of the ten roses here please me greatly.  There is nothing wrong with the other four, I just had the urge to switch things out ... to plant four different roses in this garden instead.  The roses that I am replacing are:


'Sombreuil'

Before.
 

Cut back for transplanting.
 
 
'Isabella Skinner'
 
Before
 

Cut back for transplanting.
 
 
'Henry Kelsey'
 
Before.
 

The tag is wrong.  I thought this rose was 'Heidelberg' when I planted it, and I never bothered to update the tag.
 
 
'Swan Lake'
 
The pink flowers are from the next rose 'Parade', arching over into Swan Lake's space.
 

Ready to transplant.
 
 
It is a fairly simple process to dig up an established rose.  Cut the rose back to a point where it is safe to work with, dig it up with as large a rootball as you can handle.  There's no artful spring pruning here ... just cut it back and dig it up.  I put these roses into large pots for now.  They should recover and start to grow again soon, and I plan to offer them for sale this fall.

I don't have photos of the flowers on the four new replacement roses yet ... they're too small and haven't flowered yet.  For the record, they are Movement, Pirontina, Orfeo, and Looping.  (each name links to that rose's page on Help Me Find, so you can see what they look like from other people's photos.)

With the weeds removed and new roses planted, it was time for mulch.  In the past, I used thick layers of newspaper under my mulch, but the soil here degrades anything organic like that at an unbelievable pace ... and soon I'm right back where I started, with weeds and nothing to help prevent them.  Landscape fabric under my nursery benches did a super job of smothering weeds for the past two years, so now I'm using it under any mulch that I apply.  I cut large holes in the landscape fabric for the roses, then I cover the holes with newspaper before adding mulch.


It's no surprise that my two day job stretched into an extra day.  By the end of Wednesday, I had made great progress.  All that's left to do now is to cut back 'Pink Pillar', 'Parade', and 'White Cap' so I can lay fabric and put mulch underneath them.  Can't do that right now, though, because there's a bird nest in 'White Cap' and I don't want to disturb it.


Accomplishments like this serve to fuel my motivation, and I'm all energized to keep at it and see how much of this place I can whip into shape.  Not resting on my success with The Arcade, on Thursday I attacked the roses and weeds in the Hybrid Tea Garden in the front yard (with the generous assistance of my friend Robert).  Weeds there are gone, Preen is applied to prevent any new sprouts, and the first two rows of landscape fabric are down.  Today, it is raining ... which forces me to stay in the house and take a day off from outside work ... but it loosens more weeds, so I get right back at it tomorrow.  (This is really therapeutic!)

What are you planning to do this weekend?

Thursday, August 22, 2013

Rose Labels

It is important to me to make sure that every rose in my garden is labeled ... legibly and permanently.   I have experimented with all sorts of ways to do this, with mixed success.  The method I'm using now is the best and most cost effective way I have found.

New Label.


The metal tag is the "Heavy-duty Rose Label" from Paw Paw Everlast Label Company.  The wire stand goes through the label part, so there's no way it can fall off and get lost.


I use a DecoColor paint marker to write the information on my labels.  You can buy these paint markers at just about any craft store.  Do NOT use a Sharpie Marker!  Sharpie is ink, and it will weather away and fade within a year.  The paint marker is just that, PAINT, and it will stay on the label pretty much forever. 


As an extra bit of insurance, I also write the information in pencil on the back of the label.  One can't be TOO safe, don't ya know.


With all of the roses labeled, visitors know what they are looking at ... and they don't have to run around to find me to ask.  It's also a lot better for me, too, so I don't have to dig out my planting plan to ID a rose with a faded tag.

Four-year-old Label.


(That fresh mulch in the background of some of these photos represents what I've been up to for the past couple of days.  It's nothing monumental, but I think it will be a big improvement.  I will show it to you tomorrow, after I'm finished.  Stay tuned.)

P.S.  The plumber gave us good news on the possibility of adding water to the Shack.  Now it's a matter of checking out a few more things, deciding whether or not we want to do it, and figuring out how much it will cost.  (Don't know about the Shack?  Click HERE to read what we're doing with the renovation of this little building.)

Monday, August 19, 2013

Cross Another Item Off the List!

Sunday was cool and rainy ... perfect weather to continue to chip away at my To Do list on our renovation of our little Shack.  The Husband joined me again, and it didn't take long for the two of us to get the last few pieces of the plywood subfloor removed. 


We found one more critter nest ... this one was made by a particularly industrious varmint.  Notice how he/she has incorporated two LONG pieces of pipe insulation into the design.  These had to be dragged through the hole in the siding, along the floor, and threaded underneath each of the joists to get into this position.  (Honestly, I never missed this and I don't remember where it was or when it was snitched.)


After we finished removing the plywood, The Husband went into the house to work on one of his paintings.  While the rain fell pitter-pat onto the Shack's metal roof, I listened to the Nascar race on the radio and I swept and scooped and cleaned the mess left by the varmints underneath the floor.  The area is now clean and ready for me to lay plastic down to help vapor-proof the old cracked concrete floor.


I had plastic here before, and some of it is in good enough condition to leave it in place ... I will put another layer over it, though, because there are a few holes and tears that need to be covered.  Better safe than sorry.


Updating the List:
1.  Sort and store (or dispose of) all of the items that are currently inside the building.
2.  Take up the plywood on the floor, evict the varmints, and clean up their mess.
2a.  (new item)  Plumbing consultation.
3.  Install vapor barrier and insulate the floor.
4.  Reinstall the plywood.
5.  Remove the dropped ceiling and all of its framing.

Work will stop here for a few days, because we are thinking about upgrading our plans for this building.  As The Husband and I worked together this weekend, we talked and schemed and brainstormed.  We threw ideas back and forth, we realized that adding plumbing for a real bathroom in this building may be something that we can do.  There is easy access to water lines behind the building ... septic design and installation is the only question.  Our plumber will be here first thing on Wednesday morning to take a look, and we'll see what he says about it.  (Cross your fingers!  I hope he gives us good news.)

Sunday, August 18, 2013

Sunday Snapshot: Removing the Floor in the Shack

I'm riding this wave of enthusiasm and motivation, as I forge onward toward reclaiming our little outbuilding that we call The Shack.  I am making great progress so far!
 
Day Three, Ruby kept me company for a while.  (I feel guilty spending so much time working, while she's inside by herself.)   I will be reusing the plywood on the floor, so I took a few minutes to number each piece and to draw a diagram to make it easier to reinstall later.

This 20' lead that Ruby is wearing isn't attached to anything.  It's an off-lead training trick that a friend taught me.  Ruby drags it around while she is outside with me, and it reminds her to listen to me.  She knows that she has to have it in order to leave the gate, and she runs to the gate and sits while I slip the collar over her head.  She knows that 'no collar = no fun with Mom'.


Let's remind you about what I'm doing here and what I've accomplished so far.  Here is The List.

1.  Sort and store (or dispose of) all of the items that are currently inside the building.
2.  Take up the plywood on the floor, evict the varmints and clean up their mess.
3.  Install vapor barrier and insulate the floor.
4.  Reinstall the plywood.
5.  Remove the dropped ceiling and all of its framing.

 
I had great plans to remove all the screws in the plywood floor ... knowing that this would go quickly and I would have that floor pulled up in no time.  Completion of Item #2 on my list was going to be a cinch ... you probably already suspect that this was not the case.

A nest made of grass, chewed-up foam cushion, and sill sealer.


Turns out, only about 1/3 of the floor was held down with screws.  I remember now that we ran out of screws when we were installing this plywood years ago, and that I had grabbed a box of nails off the shelf and we continued on.  

Nest #2:  grass, roofing felt, sill sealer, foam, and two Home Depot bags.


I also failed to remember that we were very generous with the construction adhesive while we were putting down this floor.  No shoddy work for us ... we wanted this plywood to stay put.  It was not coming back up without a fight.

Nest #3:  similar materials as Nest #2, but with more grass and less foam.


It became obvious very quickly that this was a job for two people, and that Ruby was going to have to go back in the house.  The Husband was available and eager to help, so we formulated a plan and got started.  It took some trial and error at first, but we soon settled on a routine that used a hammer, two sizes of pry bars, and a 6' digging iron to carefully-as-possible pry up each piece of plywood.

Nest #4, sticking out underneath a joist ... haven't removed the plywood on top of this one yet.


By the end of the afternoon, both of us were both pretty spent.  We didn't get ALL of the floor up, but we made great progress.  This is what it looked like when we quit for the day.

The plywood on the right is the stack of what we have removed already.  The piece on the left is still attached.


I was surprised to see how much animal activity had taken place underneath the floor.  All that daylight in the walls, and the places in the floor where we never got around to putting plywood made for easy access for industrious critters.  My underlayment of roofing felt, so carefully laid over the original floor of cracked concrete, is now chewed up and all over the place.  Though I still believe that the bags of potting soil were dug into and scattered by a groundhog, I suspect that the nests we found in the framing were from some other type of varmint. 

All of the nests were really clean and new looking, and none of them appeared to have been recently occupied, thank goodness ... in fact, I haven't seen any kind of critter in here at all, live or dead, while I've been working.  Perhaps this is somehow related to the BIG snake skin that I found while I was sifting through my pot dump that had been in the corner of the building.  You already know that I'm not afraid of snakes, and I thought it was really cool to have had one that big in there at one time.  Snakes go where the food is ... they eat rats, mice, etc., so more snakes = fewer rodents.

In conclusion, I feel really good about how much we accomplished so far ... even though I can't cross Item #2 off the list quite yet.  Later today, for certain.

Happy Sunday, Everyone!

Saturday, August 17, 2013

Progress on the Shack: Small Victories

It's been two days working in the Shack so far ... sorting, storing, and disposing of the items in there.  Though it's not completely empty, I am going to say that it's close enough for me to cross Item #1 off of my to do list for this project.

Looks better, doesn't it?


Here is a reminder of what this looked before I started:


It should only take a few minutes to get the rest of this stuff out of here, so I can start on Item #2.

Northwest corner.
 

Northeast corner.
 

Southeast corner.
 

Southwest corner.


Updating the List:

1.  Sort and store (or dispose of) all of the items that are currently inside the building.
2.  Take up the plywood on the floor, evict the groundhog and clean up his mess.
3.  Install vapor barrier and insulate the floor.
4.  Reinstall the plywood.
4.  Remove the dropped ceiling and all of its framing.


The battery for my screw gun is all charged, and I have a spare battery on the charger for when I need it.  Stay tuned, because some floor is coming out today!