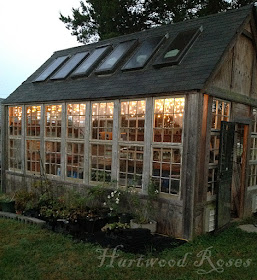
My husband and I are off having fun for the next few days. This was the scene outside our window, right before the sun rose this morning.
Pages
▼
Sunday, November 20, 2016
Thursday, November 17, 2016
As Gardening Season Winds Down
Fall is officially here, and winter will soon bring freezing temps and an end to outdoor gardening. What's a rose gardener to do? Bring the garden indoors, of course.
In my last post (which was WAY too long ago) I showed you how I brought a bit of light and cheer into my greenhouse. Next thing on my list was to finish preparing the area where the baby roses will spend the winter.
In my last post (which was WAY too long ago) I showed you how I brought a bit of light and cheer into my greenhouse. Next thing on my list was to finish preparing the area where the baby roses will spend the winter.
Instead of heating the whole building to keep the little pots from freezing, using a TON of propane in the process, I'm going to use a propagation heat mat underneath the pots. I put two layers of insulation on the bench (one piece of solid foam and a layer foil bubble insulation, topped with the heat mat.
The mat is connected to a thermostat with a probe, to monitor and control the temperature of the pots. So far, it's working really well.
The read-out on the thermostat shows the temperature of the pot that contains the probe.
The sun warms the greenhouse during the day, and the mat should only be needed during really cold nights.
In the house, things are going gang-busters in the propagation area in my basement workshop.
I planted these cuttings at various times in October, and some of them are already showing awesome roots! (I attribute this to some good luck, careful attention, and a little bit of help from bottom heat provided by the fluorescent light on the shelf below the cuttings.) Roots usually show in four to eight weeks. It looks like these little baby cuttings are VERY anxious to grow up and become real plants.
Allow me introduce you to ...
"Haywood Hall" A Noisette rose that was found at Haywood Hall in Raleigh, North Carolina. It is one of the best Noisettes in my garden and very few people know about it. Because of this, I want to share it around to make sure that it doesn't disappear.
Spray of "Haywood Hall" in my garden last month.
Tag, showing the date that I planted the cuttings.
Growing roots like this after only three weeks!
'Pink Poodle' (a miniature rose from 1991) is very rare and, again, needs to be propagated and spread around to insure its survival.
'Pink Poodle' showing some deeper-than-normal color in cooler autumn weather.
Cuttings didn't even drop one leaf.
Visible roots in three weeks!
"Talcott White Noisette" grows in Hollywood Cemetery. It is a very old, very large plant, in an out-of-the-way location. As far as I know, no one has ever propagated it.
Visible roots in four weeks!
While I was in Harrisonburg, Virginia, last month, I visited Woodbine Cemetery. I always have my tools with me, and I took a few cuttings of the roses that I saw there. One of them was an incredibly fragrant Noisette-type rose.
The flowers on the cuttings perfumed my whole car.
The plant at the cemetery is 7-8 feet tall.
Visible roots in three weeks!
While the outdoor garden is slowing down, you can see that things are just getting started indoors. Soon, the basement rose babies will be potted up, and they will join their buddies to spend the winter in the greenhouse ... gonna have to tidy up some more to make space on the bench for them.
*************************
To learn the method that I use to root roses, click HERE.
Sunday, November 6, 2016
Sunday Snapshot: Lights in the Greenhouse
You know that I'm all about doing projects with as much of what I already have as possible. Adding lights to the greenhouse last week is another example of this.
Two strings of icicle Christmas lights hung on cup hooks along the top of the south wall. It's so cute!
I already had the cup hooks and lights. All I had to buy was a remote wall switch to control them.
The greenhouse itself is a mess, with lots of stored building materials and project items taking up most of the 12' x 20' space. I have cleared a bit of sanity space on the south bench to over-winter the baby roses that I rooted last summer, and I'm doing what I can to make order out of the rest of the space ... sorting, purging, and figuring out what to do with items I really love and will use.
This will be a great space to work in during the winter, as the temperature in the building on a sunny day is easily twenty or more degrees above the outside temperature. It can be cold and wintry outside, shirt-sleeve weather inside ... just what my little sunshine-loving self needs!
Two strings of icicle Christmas lights hung on cup hooks along the top of the south wall. It's so cute!
I already had the cup hooks and lights. All I had to buy was a remote wall switch to control them.
This is the handiest thing ever for adding a light switch anywhere you need one.
You can find it HERE.
The greenhouse itself is a mess, with lots of stored building materials and project items taking up most of the 12' x 20' space. I have cleared a bit of sanity space on the south bench to over-winter the baby roses that I rooted last summer, and I'm doing what I can to make order out of the rest of the space ... sorting, purging, and figuring out what to do with items I really love and will use.
This will be a great space to work in during the winter, as the temperature in the building on a sunny day is easily twenty or more degrees above the outside temperature. It can be cold and wintry outside, shirt-sleeve weather inside ... just what my little sunshine-loving self needs!
********************
Sunday Snapshots are posts devoted to moments in time that represent glimpses into real, everyday life in Hartwood, or wherever else I happen to be at the time.
Thursday, November 3, 2016
Learning a Different Way to Knit
I taught myself how to crochet when I was ten or eleven years old. Bought a book, followed the instructions and illustrations, and practiced a lot. Learned to knit shortly thereafter, using the same book.
Since I taught myself and didn't have anyone to show me, I don't knit the way most other people do. I hold the yarn in my left hand (exactly like I do when I'm crocheting) and I could never make the switch to the American-style knitting where yarn is in the right hand. Whenever I'm knitting somewhere where other people can watch, it's not unusual for someone to tell me that I knit funny. I do, but that's okay. My knit items look exactly the same as anyone else's.
Last weekend, I was at a conference and I spotted a woman knitting during one of the presentations. She was sitting nearby at lunch, I asked her what she was making. Our conversation led to the different styles of knitting, and I told her that I knit different than any established style. She then said, "Since your yarn is already in your left hand, why don't you try to knit Continental Style?"
OMG!!!! This was such a simple observation on her part, and it was huge for me! When I got home the next day, I headed straight for YouTube and found SO many helpful videos. This one was my favorite.
It was a slow go at first. Frustrating, with quite a few dropped stitches, as I tried to get better at inserting the needle in a different spot in the stitches to pick up the yarn with my right needle instead of throwing it with my whole hand. Even in this awkward beginner stage, Continental style knitting was proving to be significantly faster than the way I used to do it. As practice, I am making a mitered-square afghan using instructions in THIS pattern. (But I'm using regular knitting needles instead of the double-pointed needles called for in the instructions.)
Knitting garter stitch, row after row, is great practice and I'm pleased to say that I'm getting more proficient and I'm having to think less and less about each individual stitch. I like this pattern because I'm only working on one square at a time, and squares are joined together as I go.
I am keeping a pace to finish one square on the afghan every evening, which gives me clear evidence of progress, almost instant gratification, and keeps me motivated to continue to the finish ... which I imagine will be some time after the first of the year.
After more than forty years of knitting my old way, it feels awesome to learn a better way to do it!
Since I taught myself and didn't have anyone to show me, I don't knit the way most other people do. I hold the yarn in my left hand (exactly like I do when I'm crocheting) and I could never make the switch to the American-style knitting where yarn is in the right hand. Whenever I'm knitting somewhere where other people can watch, it's not unusual for someone to tell me that I knit funny. I do, but that's okay. My knit items look exactly the same as anyone else's.
Winnie's Tiny Dog Sweater. Pattern is HERE.
Last weekend, I was at a conference and I spotted a woman knitting during one of the presentations. She was sitting nearby at lunch, I asked her what she was making. Our conversation led to the different styles of knitting, and I told her that I knit different than any established style. She then said, "Since your yarn is already in your left hand, why don't you try to knit Continental Style?"
OMG!!!! This was such a simple observation on her part, and it was huge for me! When I got home the next day, I headed straight for YouTube and found SO many helpful videos. This one was my favorite.
It was a slow go at first. Frustrating, with quite a few dropped stitches, as I tried to get better at inserting the needle in a different spot in the stitches to pick up the yarn with my right needle instead of throwing it with my whole hand. Even in this awkward beginner stage, Continental style knitting was proving to be significantly faster than the way I used to do it. As practice, I am making a mitered-square afghan using instructions in THIS pattern. (But I'm using regular knitting needles instead of the double-pointed needles called for in the instructions.)
Working on the second square, attached to the first one.
Knitting garter stitch, row after row, is great practice and I'm pleased to say that I'm getting more proficient and I'm having to think less and less about each individual stitch. I like this pattern because I'm only working on one square at a time, and squares are joined together as I go.
Winnie likes to sit under the pile of knitting in my lap.
I am keeping a pace to finish one square on the afghan every evening, which gives me clear evidence of progress, almost instant gratification, and keeps me motivated to continue to the finish ... which I imagine will be some time after the first of the year.
After more than forty years of knitting my old way, it feels awesome to learn a better way to do it!


